Managing MySQL, MariaDB, and other databases via the command line is not easy, especially for those who are not particularly familiar with Linux. In this article, I will tell how you can install phpMyAdmin on your ubuntu server and create new databases visually through it. And you can use these databases in your CMS project and other web app projects.
What is phpMyAdmin?
phpMyAdmin is a free and open-source software/tool for managing MySQL and MariaDB. This tool is written in PHP, and it is the most popular database administration tool, especially for web hosting services. phpMyAdmin primarily comes preinstalled with shared web hosting services (like cPanel hosting).
Pre-requisites for Installing phpMyAdmin on Ubuntu
Before installing phpMyAdmin on Ubuntu or Debian system, you must make sure that some required components are installed. However, you can download the package without the required elements, but you cannot configure it without them.
- Apache Web Server
- MySQL/MariaDB
- PHP 7.4.x or above (for best performance)
Apache2 web server is required to make HTTP protocol, so we can access phpMyAdmin using a web browser, and you also need pre-installed MySQL or MariaDB database to manage other databases or create a new one. Although, if you are thinking to create a web project based on PHP language, then you should also install the latest version of PHP, which is PHP 8.0.
Steps of Installing phpMyAdmin on Ubuntu
As I have already mentioned, you must install an Apache web server, MySQL or MariaDB database, and PHP. If you have not installed these packages in the system, you can follow the LAMP stack installation method or execute the following command to install this pre-requisite software.
Install Pre-requisites components
Update system:
sudo apt update -ysudo apt upgrade -yInstall Apache, PHP, and MySQL (MariaDB) database:
sudo apt install apache2sudo apt install php-clisudo apt install mariadb-serverWhen you execute the command, the system will prompt you to “Do you want to continue?” several times. You have to type “Y” and then ENTER on the keyboard. Your Apache server, PHP, and Database installation are complete, but you must start the services by running the command. Sometimes these services run automatically after installing packages.
Start Apache Webserver:
sudo service apache2 startStart MySQL Database:
sudo service mysql startSecure MySQL/MariaDB
Before installing phpMyAdmin and configuring it, you must secure the MySQL/MariaDB database, using the following command.
sudo mysql_secure_installationWhen you execute the command, the system will ask some questions, and you must give the answers according to the list below.
- Enter current password for root (enter for none): Press ENTER key
- Set root password? [Y/N]: Y
- New password: Type your password
- Re-enter new password: Type your password again
- Remove anonymous users? [Y/N]: Y
- Disallow root login remotely? [Y/N]: Y
- Remove test database and access to it? [Y/N]: Y
- Reload privilege tables now? [Y/N]: Y
Install phpMyAdmin & Configure
After securing the MySQL database, you must execute the following command to install the latest version of phpMyAdmin on the Ubuntu server.
sudo apt install phpmyadmin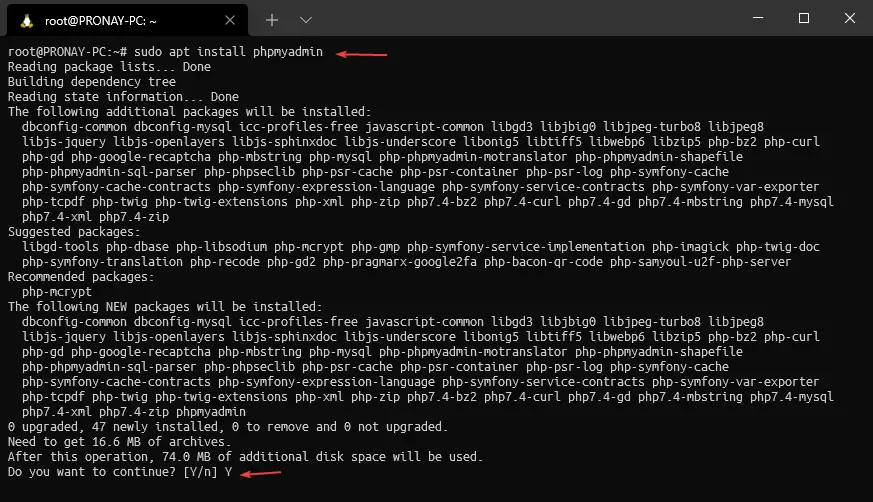
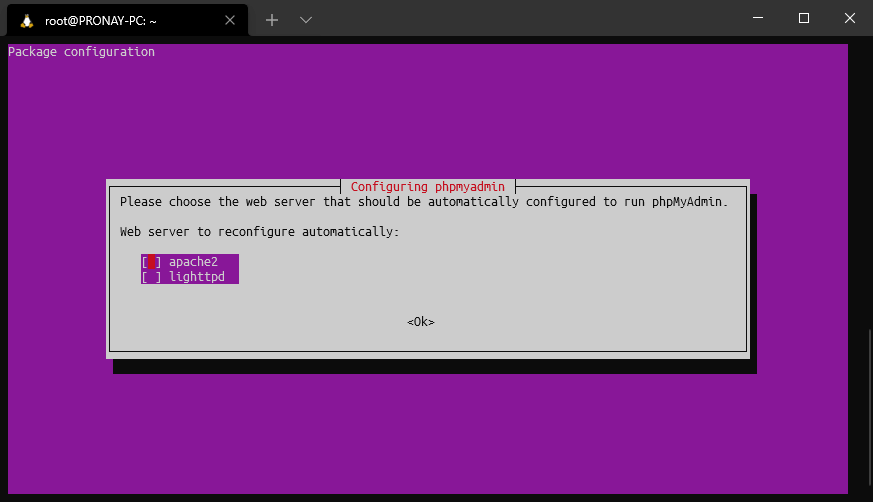
Select web server:
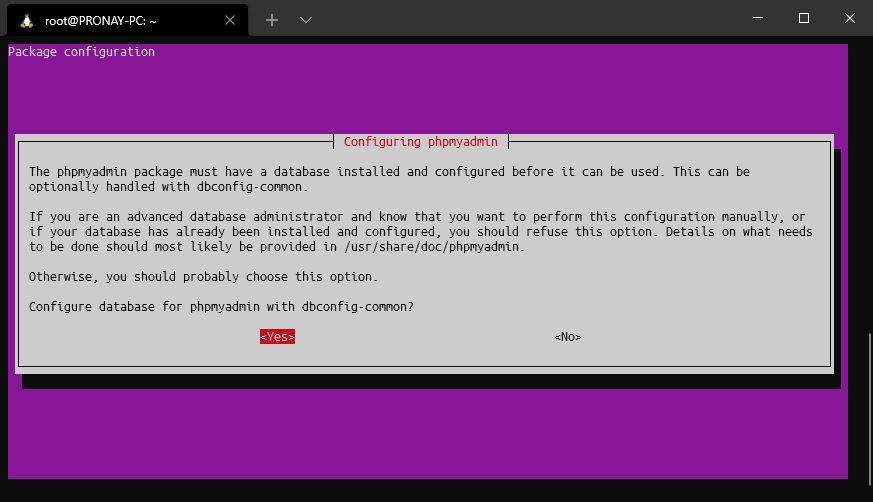
Auto-configure phpMyAdmin:
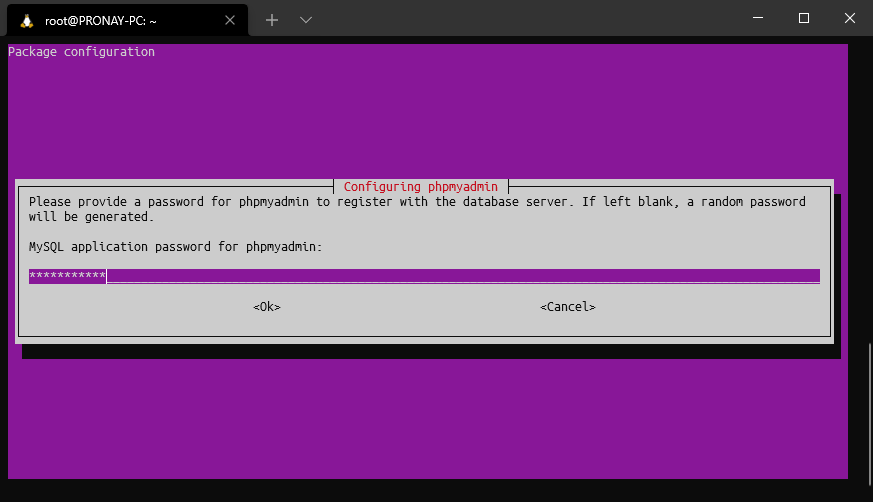
Enter Password for phpMyAdmin:
Re-enter phpMyAdmin password:
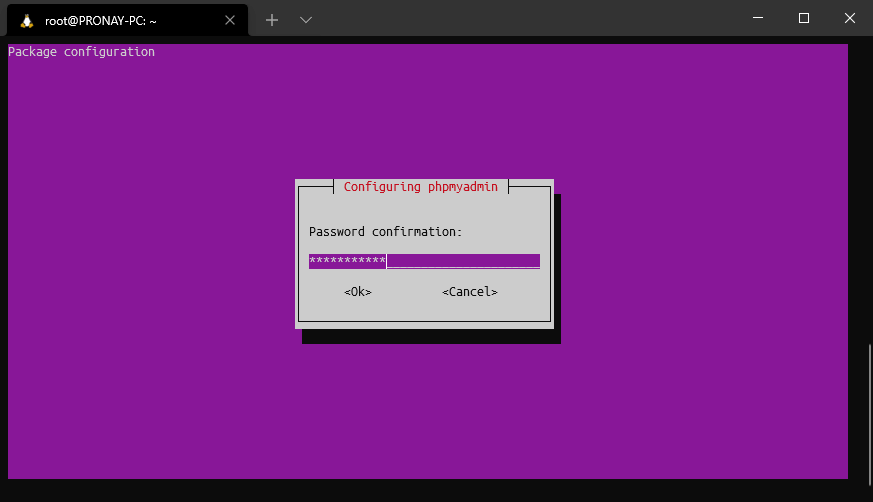
Success phpMyAdmin installation:
Creating config file /etc/phpmyadmin/config-db.php with new version
checking privileges on database phpmyadmin for phpmyadmin@localhost: user creation needed.
granting access to database phpmyadmin for phpmyadmin@localhost: success.
verifying access for phpmyadmin@localhost: success.
creating database phpmyadmin: success.
verifying database phpmyadmin exists: success.
populating database via sql...  done.
dbconfig-common: flushing administrative password
Setting up php-gd (2:7.4+75) ...
Processing triggers for man-db (2.9.1-1) ...
Processing triggers for libc-bin (2.31-0ubuntu9.2) ...
Processing triggers for libapache2-mod-php7.4 (7.4.3-4ubuntu2.4) ...
Processing triggers for php7.4-cli (7.4.3-4ubuntu2.4) ...
root@PRONAY-PC:~#
Login to phpMyAdmin
After installing phpMyAdmin successfully, you have to log in phpMyAdmin dashboard. However, you could face some possible errors. But I am also rectifying all the possible errors, during installation or after the installation.
So, open your web browser and visit http://your_ip_address/phpmyadmin , and in case you are installing phpMyAdmin on a local machine, then visit http://localhost/phpmyadmin.
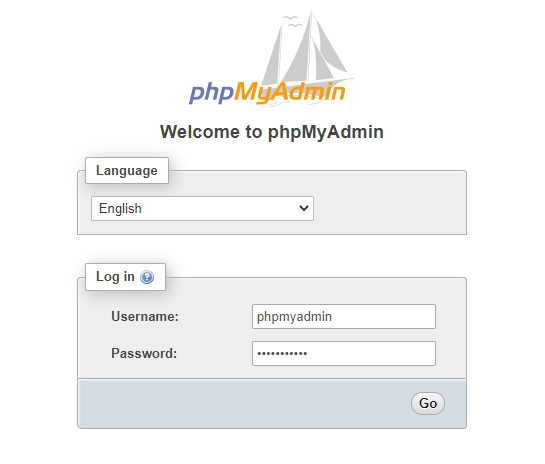
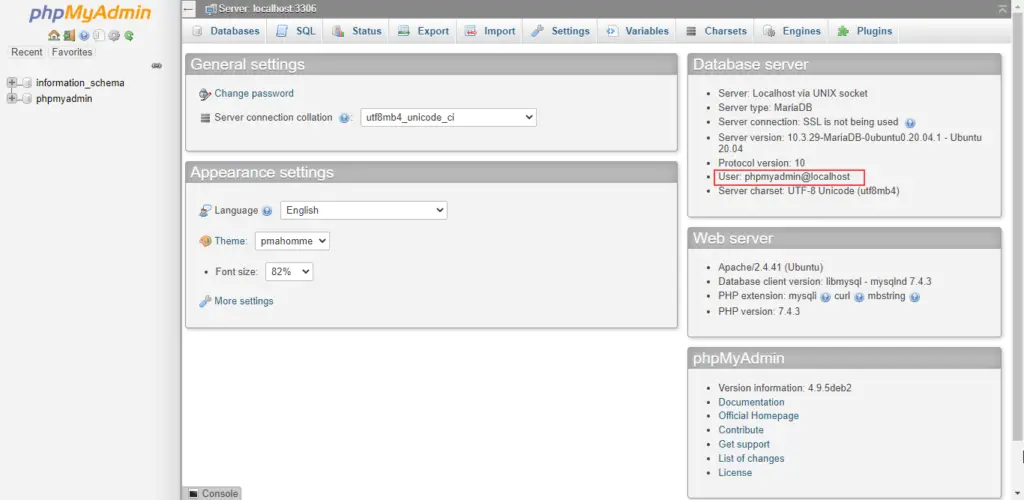
Suppose you configure phpMyAdmin using the automatic method as the tutorial. In that case, it automatically creates a new database named ‘phpmyadmin’, and the user also ‘phpmyadmin.’ So, log in with the user name ‘phpmyadmin’ and the password made earlier.
Possible error while/after configuring phpMyAdmin
After installing the phpMyAdmin in the Ubuntu server, you may face some errors like 404 not found and no privileges to create a database or Access denied for the root login. So, in this article, I am going to resolve all the issues.
404 Not Found
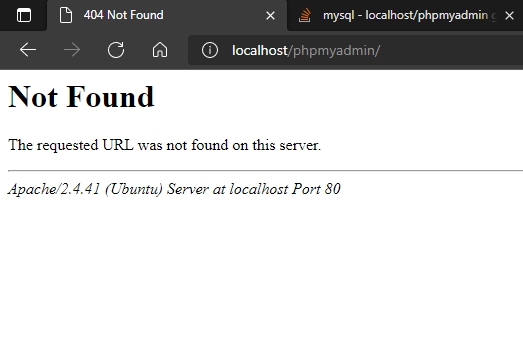
If you get a 404 not found error when you visit the phpMyAdmin URL, that means your Apache server configuration with phpMyAdmin is not fully configured. For completing the setup or resolving the error, you must edit apache.conf file.
sudo nano /etc/apache2/apache2.confUse nano to edit apache.conf file and add the following line in the last.
Include /etc/phpmyadmin/apache.confAfter adding the line, you must restart the Apache server and open the URL, and phpMyAdmin will work.
sudo service apache2 restartAccess denied for user ‘root’@’localhost.’
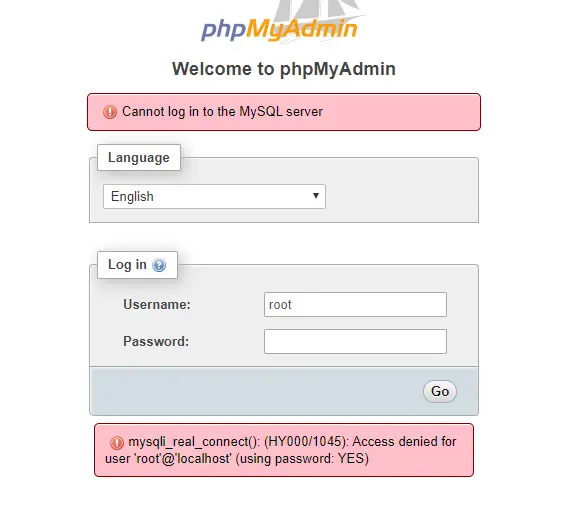
If you try to log in with the root, phpMyAdmin may show the access denied error. Cause the phpMyAdmin configuration. First, you have to give full privileges to the root user upon phpmyadmin database and then change the username on phpMyAdmin.
Login to MySQL:
sudo mysql -u root -uWhen you execute the command system will prompt you to enter your MySQL root password.
Give full privileges to the root user upon phpmyadmin:
GRANT ALL PRIVILEGES ON phpmyadmin.* TO root@localhost IDENTIFIED BY 'password';After login into MySQL, you have to execute the following command to give full privileges to the root user. As you can see the password on the command you have to put in your MySQL password.
FLUSH PRIVILEGES;exit;Now flush the privileges and then execute the exit command to quit MySQL CLI.
Edit config-db.php:
nano /etc/phpmyadmin/config-db.php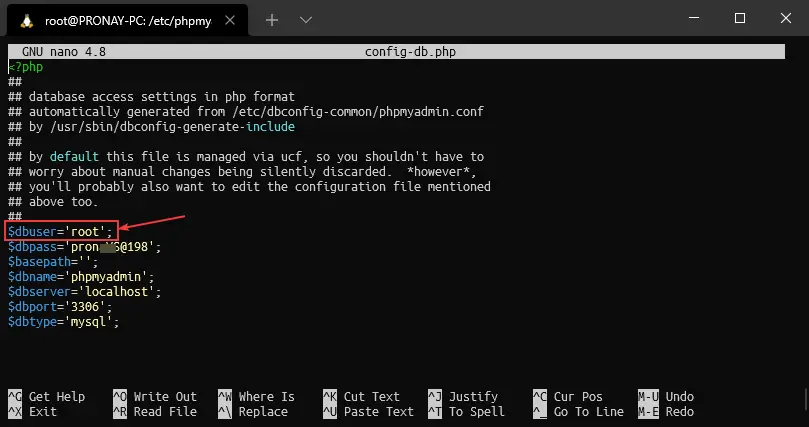
When you execute the command to edit config-db.php, the terminal will open a GNU nano editor, and you will see $dbuser as phpmyadmin. So, you must change it to ‘root’ from ‘phpmyadmin,’ as you can see in the image above.
Root privileges dashboard of phpMyAdmin:
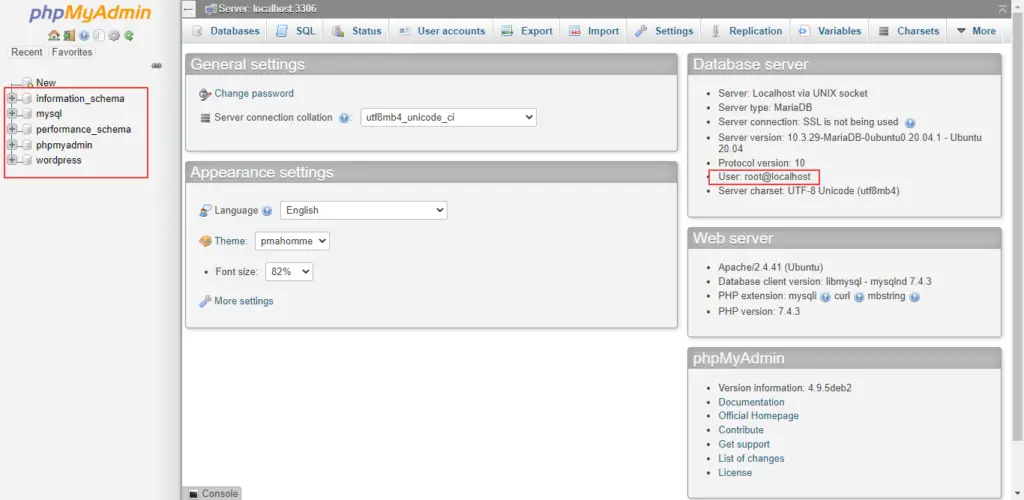
Now, successfully configuring the phpMyAdmin, you can log in with your root username and password. And as you can see from the image of the phpMyAdmin dashboard, you will access all databases, and you can create new databases.
Conclusion
So, that was the easiest method to install phpMyAdmin in your Ubuntu server, and this method also works with other versions of Ubuntu, and with Debian operating systems. If you face any other issues please let us know in the comment box.