OpenLiteSpeed/LiteSpeed web server is one of the fastest web servers available for website developers. In this article, I will share how to install a WordPress on OpenLiteSpeed on Ubuntu 22.04 system. LiteSpeed is known for its best performance, security, and scalability.
In case you are still on an older web server platform like Apache, then LiteSpeed could be the best migration option. Its supports almost Apache’s all modules which makes easier migration from one to another.
So, let’s get started with the step-by-step procedure to install a WordPress site on the OpenLiteSpeed web server.
Pre-requisites to Install a WordPress on OpenLiteSpeed web server:
- System Root access
- OpenLiteSpeed web server installed on the system
- Should be install PHP and MariaDB/MySQL Database
- A domain name
Must Read: How to Install OpenLiteSpeed on Ubuntu 22.04
Table of Content:
- Step – 1. Connect to the System using SSH
- Step – 2. Create WordPress Site Directory
- Step – 3. Create a New Virtual Host
- Step – 4. Create Listeners
- Step – 5. Create Database for WordPress
- Step – 6. Point Server IP to Domain Name (DNS)
- Step – 7. Initial Configuration of WordPress Site
- Step – 8. Configure SSL Certificates
- FAQs
- Conclusion
Step#1
Connect to the server using SSH
In this article, I assume you have already installed the OpenLiteSpeed web server on the system, if not then please refer to our recently published article, that guide how to install OpenLiteSpeed step-by-step.
Use any reliable SSH client (Putty or Termius is suggested) on Windows or if you are using a Linux system then you can use the built-in terminal. Use the following command format to connect your Virtual server.
If you are using private key encryption:
ssh -i <private key path> root@server_pub_ipIf you are using password/passcode encryption:
ssh -i root@server_pub_ipOn Windows if you are using Putty as an SSH client then check out the configuration, on putty, you have to specify a port, password, or private key step-by-step.
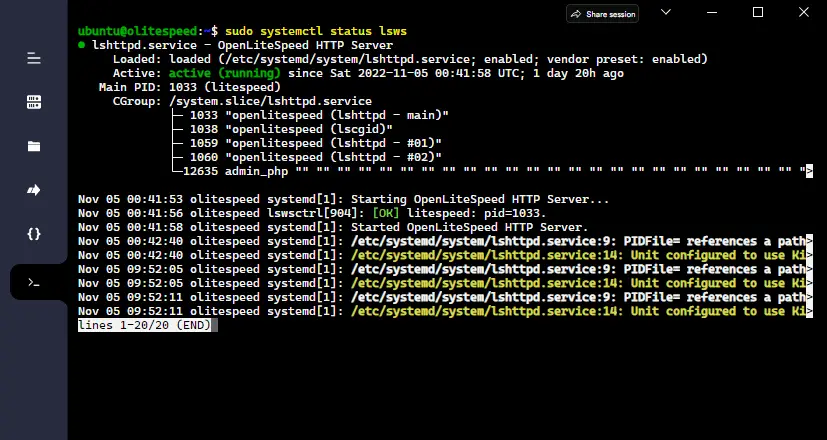
After a successful connection check the OpenLiteSpeed web server status. If it is not active as shown in the image, then use the following command.
sudo systemctl start lswsStep#2
Create a site directory and Download WordPress files
To install WordPress on OpenLiteSpeed, you should create a directory or sub-directory for different sites. Yes, on the OpenLiteSpeed web server, you create multiple WordPress or any other websites. There are no restrictions like CyberPanel, there you got only two website options, and for more, you have to pay for the license.
Create Directories
To create directories for the WordPress site, execute the following commands:
sudo mkdir /usr/local/lsws/<your_site>sudo mkdir /usr/local/lsws/<your_site>/{html,logs}Replace <your_site> with your site name or you can put any good name you want.
Give Read & Write Permission
sudo chown -R nobody:nogroup /usr/local/lsws/<your_site>sudo chmod 755 -R /usr/local/lsws/<your_site>Download the WordPress Files
After creating the directories for your WordPress site, you must download the WordPress core files in zip format from the official site. However, you can perform this step after, the virtual host configuration, but I will suggest you do it now.
To download the latest version of WordPress, use the use command:
sudo wget -c https://wordpress.org/latest.tar.gzExtract the WordPress compressed files:
sudo tar -xvzf latest.tar.gzMove extracted files to the WordPress directory:
sudo rsync -avP ~/wordpress/ /usr/local/lsws/<your_site>/html/Step#3
Create a New Virtual Host for WordPress
The best thing about OpenLiteSpeed is you don’t need the command line for every configuration (however you can use the command line), you get a GUI-based admin console, where you can configure the web server for WordPress or any other sites.
Log in to Admin Console
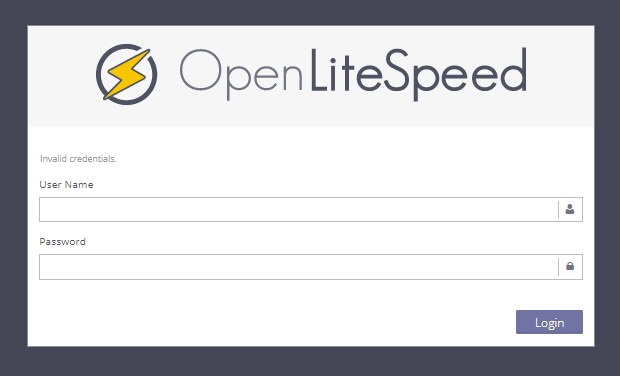
LiteSpeed/OpenLiteSpeed uses port 7080 for the web server’s admin console. To access that open link on your web browser in the following format http://your_public_ip:7080. When you open this link first time, the web browser prompts a warning about security risk, just click on advanced and proceed.
Now enter the credentials of the OpenLiteSpeed admin console, and log in.
Create Virtual Host:
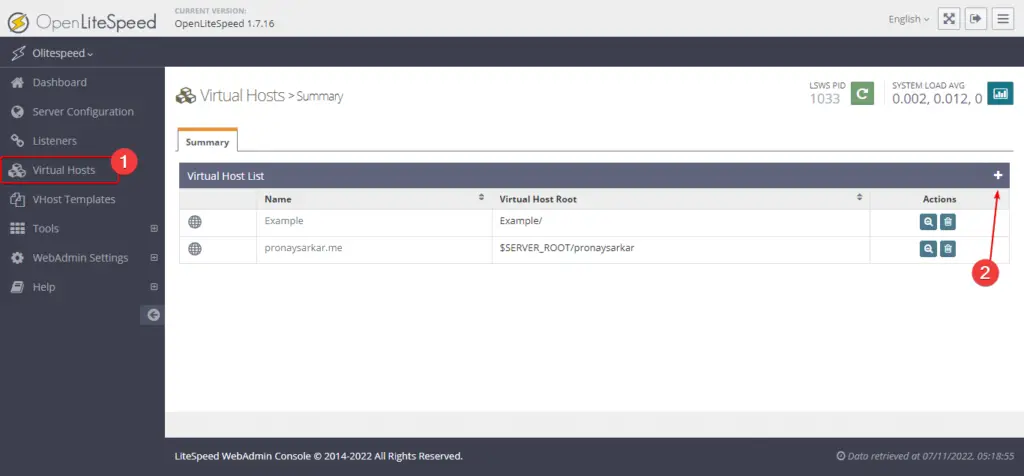
Creating a virtual host is required in OpenLiteSpeed web servers, even in other web servers like Apache and Nginx. To install multiple WordPress sites, you will need to create multiple virtual hosts. After login into the admin console, select ‘Virtual Hosts’ and click on the plus (+) sign to add a new one.
Must Read: - How to create and enable Virtual Host on Apache web server?
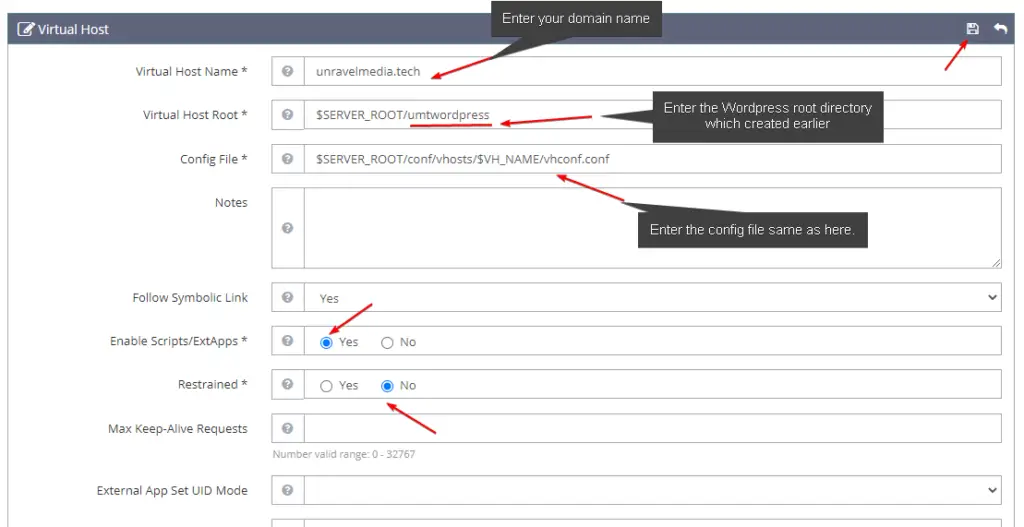
As shown in the image above you have to fill up the given fields as listed:
- Virtual Host Name:
<your_site> - Virtual Host Root:
$SERVER_ROOT/<your_site> - Config File:
$SERVER_ROOT/conf/vhosts/$VH_NAME/vhconf.conf - Follow Symbolic Link: Yes
- Enable Scripts/ExtApps: Yes
- Restrained: No
After entering the information, click on save as you can see the picture in below.
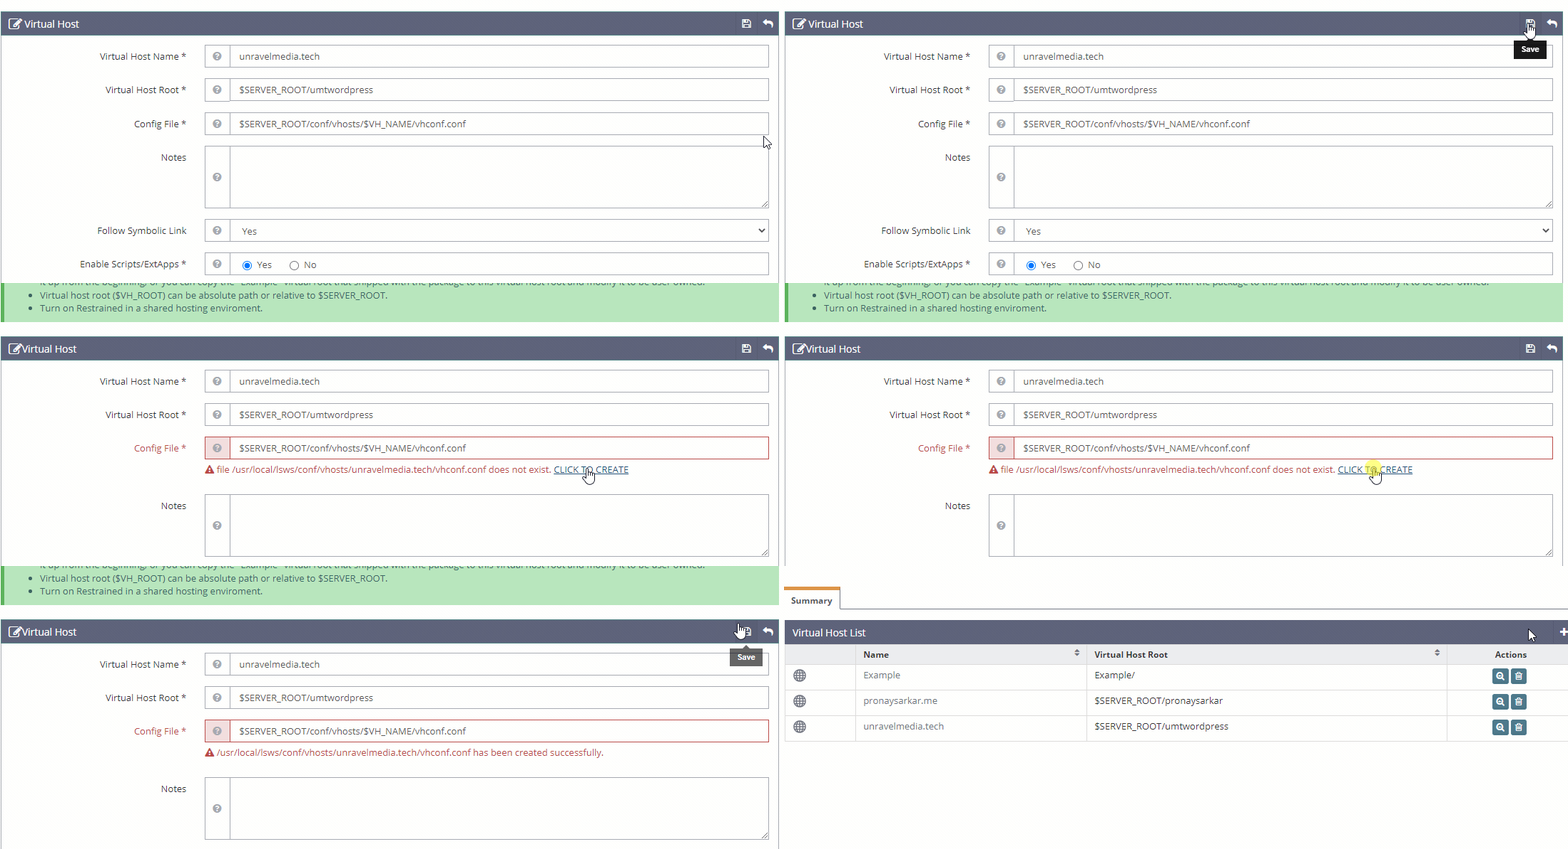
When you click on save, it will show an error and prompt you to create a new conf file. Click on ‘CLICK TO CREATE’ and save again.
Edit New Created Virtual Host:
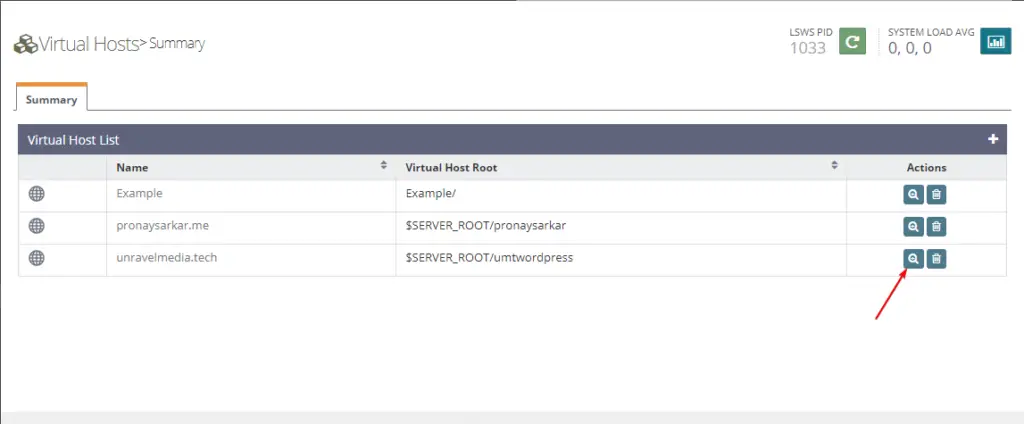
Click on the magnifying glass (as shown in the image above) to edit the virtual host. Now select the ‘General’ option and edit the general setting as shown in the image.
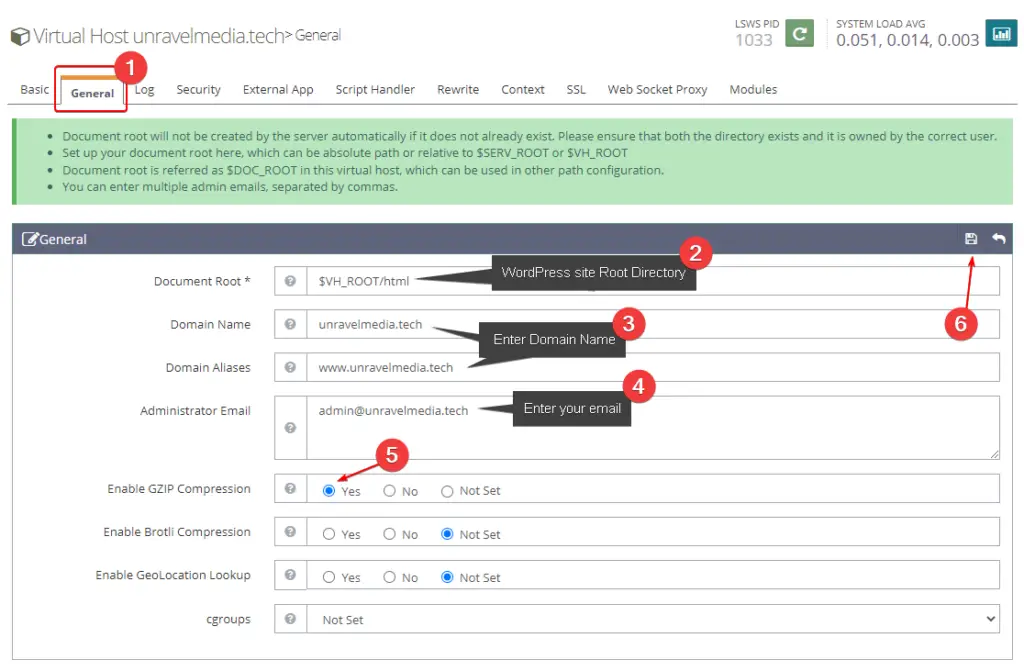
- Document Root:
$VH_ROOT/html - Domain Name: example.com
- Domain Aliases: www.example.com
- Administrator Email: [email protected]
- Enable GZIP Compression: Yes
- Enable Brotli Compression: Not Set
- Enable GeoLocation Lookup: Not Set
- cgroups: Not Set
Enter the ‘General’ configuration info as mentioned above in the list, and replace example.com with your domain name. After filling up all the configuration data, click on the save icon to save.
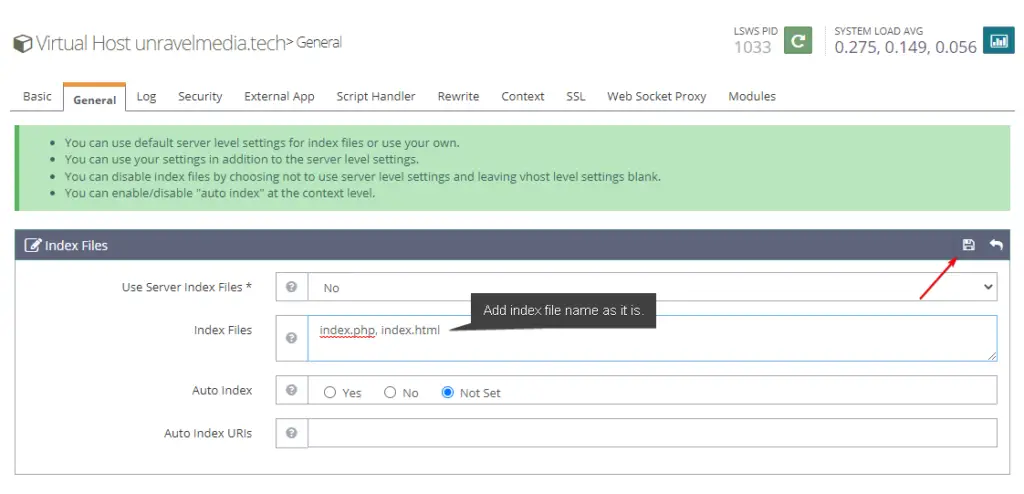
Now save the ‘General’ setting and edit ‘Index Files.’ Mentioning the index file name in the server will help the server recognize then easily. In the index, files section add index.php (WordPress uses this one) and index.html as shown in the image above.
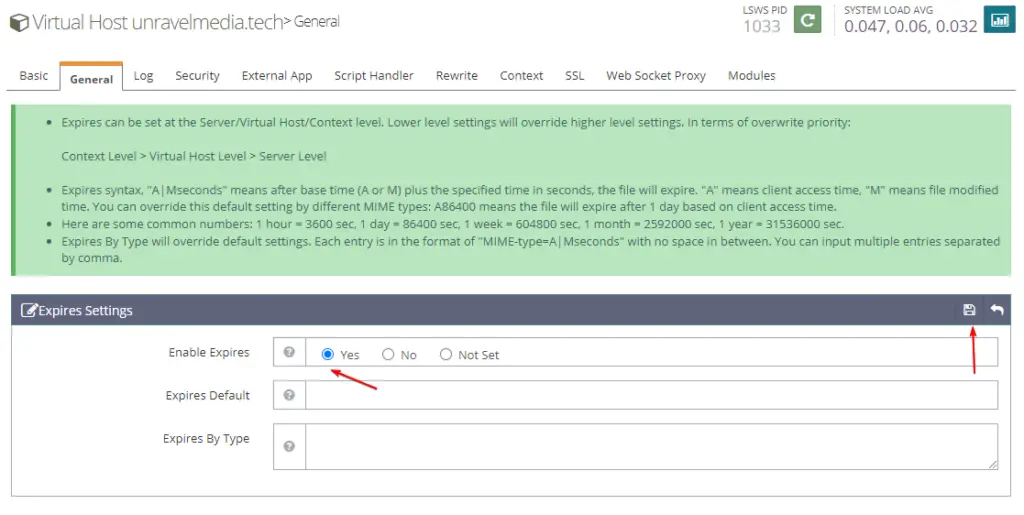
After saving index files, edit ‘Expires Settings’ as shown in the image, enable expires, and hit save the settings. This setting is optional if you are using CDN services like Cloudflare or any others.
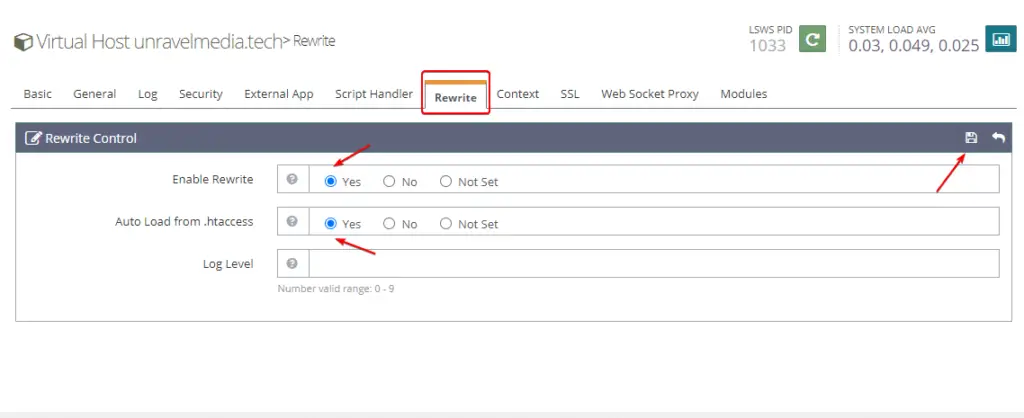
The URL rewrite engine is a component of a web server, and it helps to rewrite or redirect URLs. And it’s required to enable rewrite control in the Virtual host. As shown in the image select ‘Rewrite’ and edit ‘Rewrite Control’ and enable the rewrite feature. Now click on the save icon to save the settings.
Step#4
Create Listeners on OpenLiteSpeed
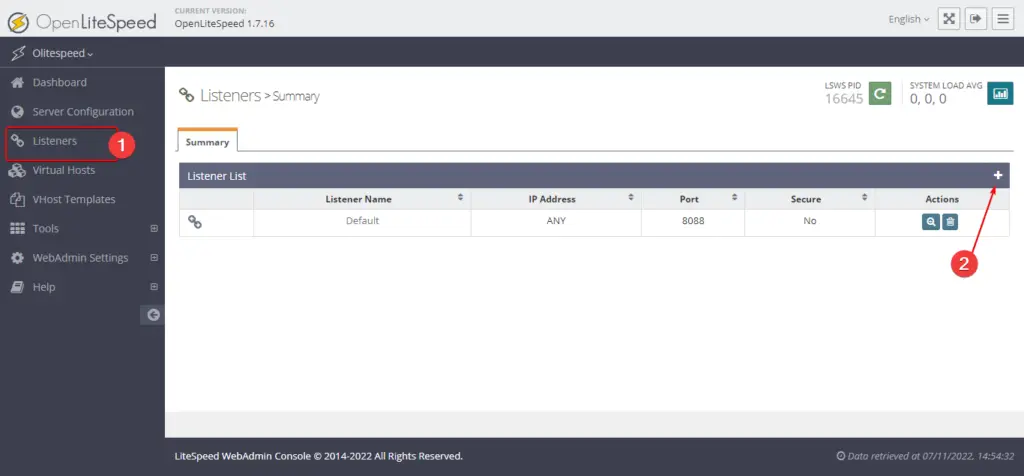
In the OpenLiteSpeed web server, you have to enable the network listener or network socket port. For web traffic requests there are two ports, one is 80 for HTTP requests and the second one is 443 for HTTPS requests. Click on the plus (+) sign to add a new listener.
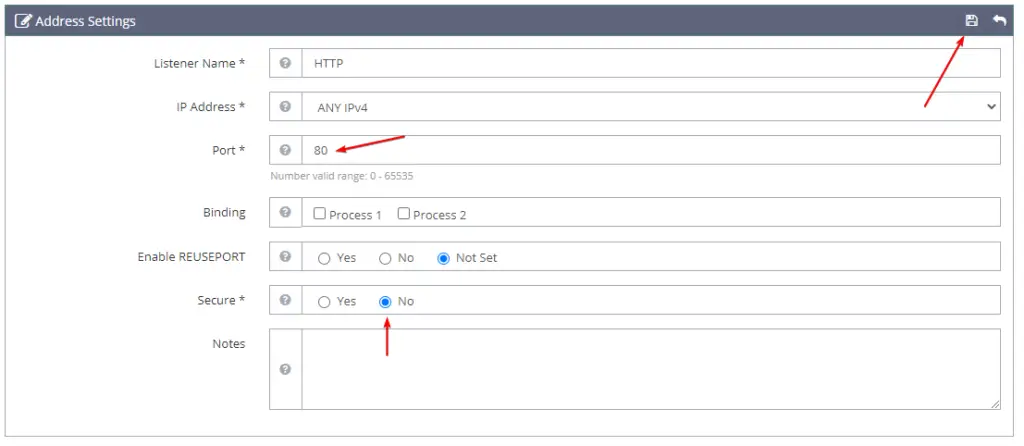
First, you have to create an HTTP listener as shown in the image above, and fill up the field as mentioned in the list:
- Listener Name: HTTP (or put any name)
- IP Address: ANY IPv4
- Port: 80
- Secure: No
Set up this configuration and leave the other as it is, and then hit save, and again click on the plus (+) sign to add a new listener.
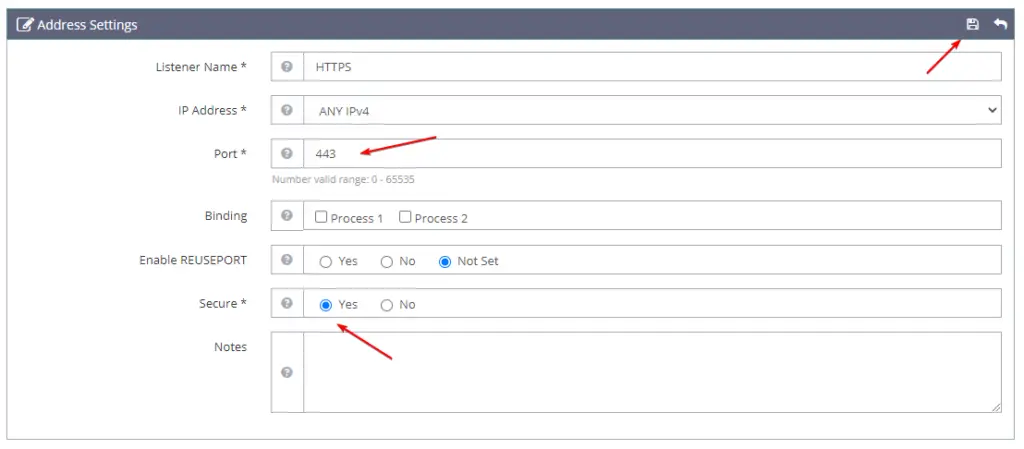
This time we need to open port 443 for a secured connection. So, we must a create listener as above but with port number 443 as shown in the image. Afterward, click on the save icon to save the information.

Now as you can see in the gif image above, same as it is we must map the virtual host to these two listeners.
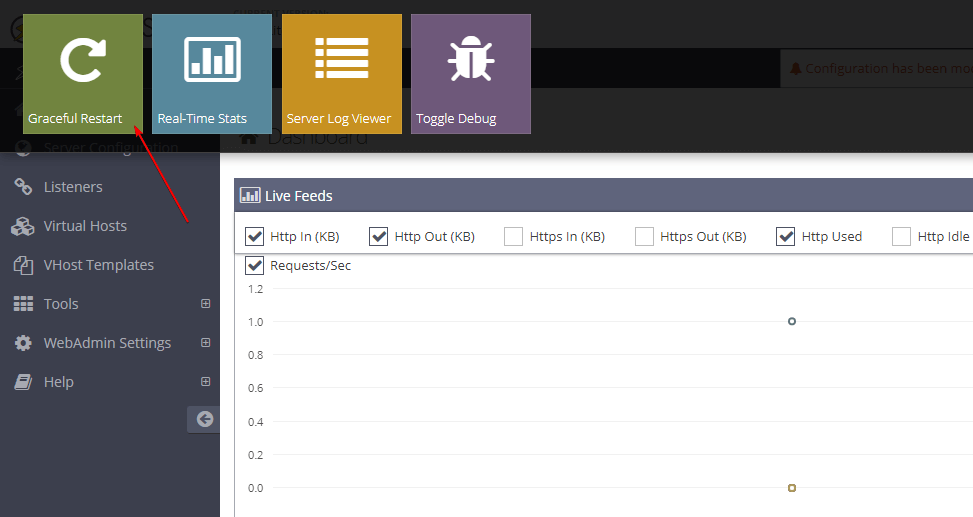
After saving all the configurations, just need to do a graceful restart to save all the information. And then we proceed to the next step, which is creating a database and configuring a WordPress site with it.

Need LiteSpeed Enterprise Powered Web Hosting?
Check out Hostinger, it is an affordable hosting provider. Their web hosting services are powered by LiteSpeed web server technology. Which is one of the fastest web technology to host WordPress CMS.
Step#5
Create Database for WordPress
After, configuring the Virtual Host and the Listeners, it’s time to create a new database. As you all know WordPress required MySQL or MariaDB database server. However, we have recently published an article regarding the OpenLiteSpeed web server, including MariaDB and PHP, check out the article for a step-by-step solution.
Here I assume you have installed MySQL/MariaDB on the system, now using the following commands you can create a database for the WordPress site.
Login MySQL/MariaDB:
MariaDB server will prompt you to enter the root password when executing the following command.
sudo mysql -u root -pCreate Database & Give Privileges:
For reference we took an example name, please replace it with any name that you want.
CREATE DATABASE example;GRANT ALL PRIVILEGES ON example.* TO root@localhost;FLUSH PRIVILEGES;Exit;If you don’t encounter any error while using these commands to create a database, that means database creation is successful. However, you can check all the database lists using the following command > SHOW DATABASES; before exiting the MySQL CLI.
Step#6
Point Server IP to Domain Name (DNS)
As I have mentioned, you should have a domain name. You can purchase affordable domain names from Namecheap, pricing starts at 99 cents. So, log in to your domain registrar and locate DNS management.
In case you are using Cloudflare like me, then simply open the DNS section and add the server’s public IPv4 address as shown in the image. And you must also add the domain aliases (www.example.com), in the CNAME section.
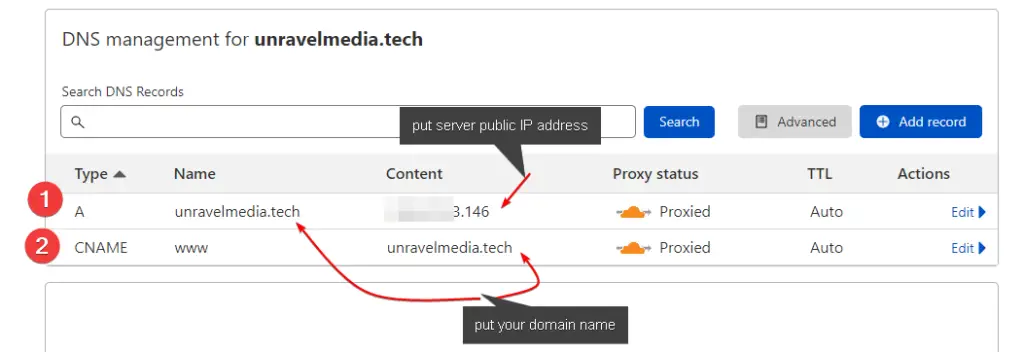
Here in the image, you can see, Type ‘A’ and ‘CNAME’, you just have to put values as mentioned above. In this tutorial, I used a demo domain name, you must use your domain name.
You don’t need, Type ‘NS’ or Name Server records, in case you have a public IP address. However, on a cloud platform like Digital Ocean, or Vultr, you will get to create Name Server records, then those records you should use to manage your DNS. Perhaps an IPv4 record is enough.
Step#7
Initial Configuration of WordPress Site
Open your domain name in a new browser tab, the WordPress setup page will open to you. Select the language and proceed step-by-step.
Select Language:
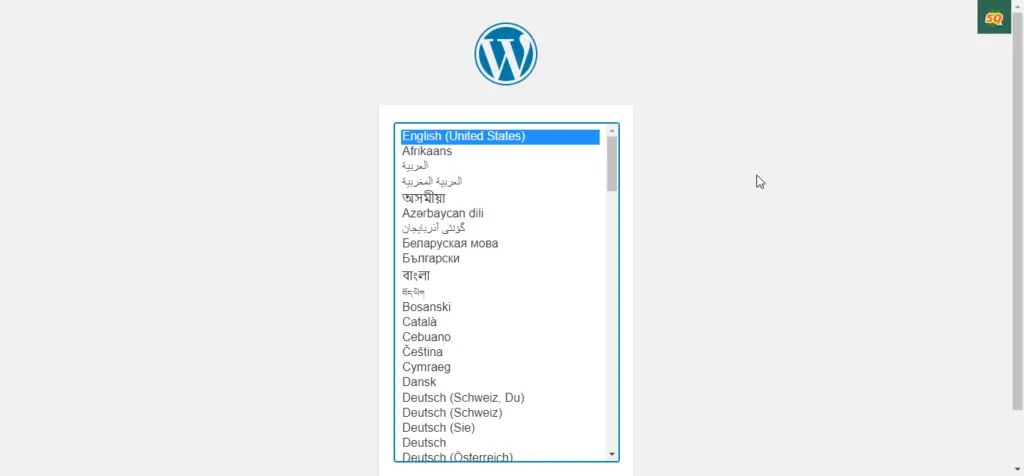
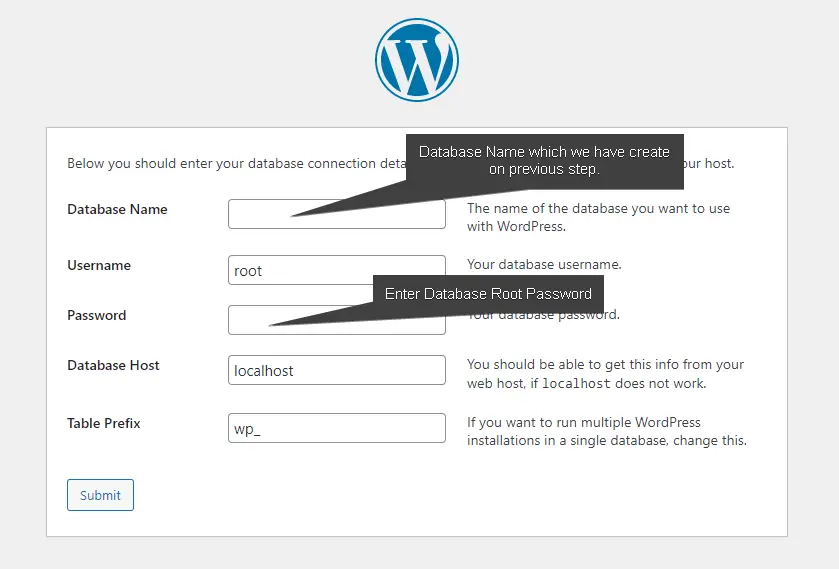
Enter Database Credentials:
WordPress Site Information:
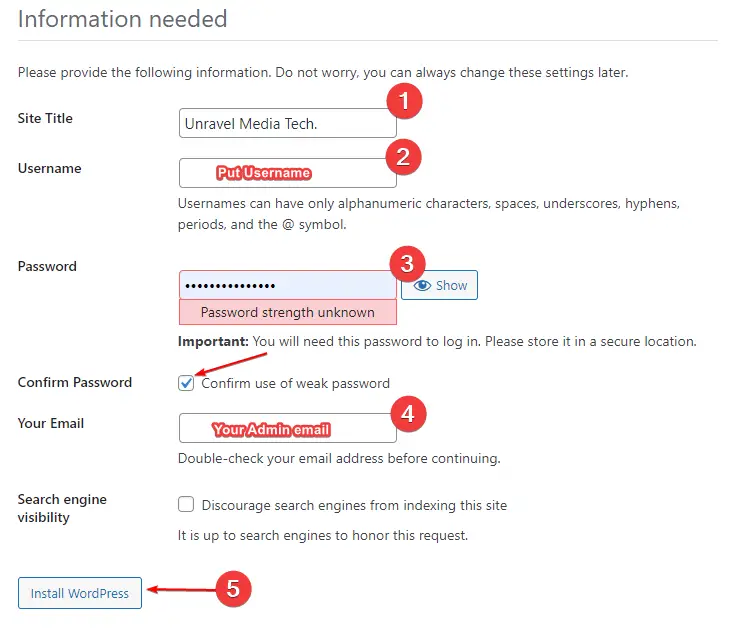
Now fill up, the WordPress site’s information and admin credentials to secure access.
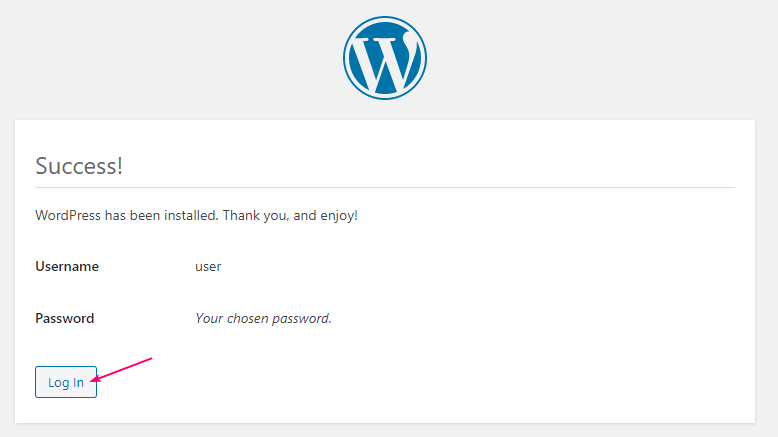
Step#8
Configure Let’s Encrypt SSL Certificate for WordPress
After the successful installation of the WordPress site on the LiteSpeed web server, it’s time to secure it with an SSL certificate. According to most SEO experts and Google search advocate John Mueller, the SSL certificate is important for Search Engine Optimization.
And whenever any visitor visits your site it shows a green lock sign on the URL section, and in case the site doesn’t have any SSL encryption it will show not secure warning and a security warning page for new visitors.
So long, we learned how to install WordPress, and now we are going to set up an SSL certificate step-by-step. However, if you are using Cloudflare then you can use the Flexible SSL, this method encrypts visitors’ traffic between the browser and Cloudflare. But having end-to-end encryption is better than nothing.
To install a free SSL certificate, we need to install Certbot, which is an open-source software tool that provides Let’s Encrypt SSL certificates for free.
First, update the system using the following command:
sudo apt updateInstall the Certbot client using the following command on Debian/Ubuntu system:
sudo apt install certbotIn case, your system is another Linux distribution rather than Debian/Ubuntu-based system then, visit Certbot official site and follow the installation instructions.
Install SSL certificate for a WordPress site:
After, installing the Certbot on the system just execute the following command to get an SSL certificate for the WordPress website.
sudo certbot certonly --webrootWhen you execute the following command for the first time, it prompts you a few questions as mentioned below:
- Enter Email address: Enter your email address
- Accept the terms of service: A
- Share your Email Address with EFF: Type Y for yes and N for No.
- Please enter the domain name(s) you would like on your certificate (comma and/or space separated) (Enter ‘c’ to cancel): Enter your domain name (example.com, www.example.com)
- Input the webroot for example.com: (Enter ‘c’ to cancel):
/usr/local/lsws/<your_site>/html/
When you enter your WordPress site’s web root location, the Certbot will again prompt you to select the location and enter a new Webroot, as the following output.
Select the webroot for www.unravelmedia.tech:
- - - - - - - - - - - - - - - - - - - - - - - - - - - - - - - - - - - - - - - -
1: Enter a new webroot
2: /usr/local/lsws/umtwordpress/html
- - - - - - - - - - - - - - - - - - - - - - - - - - - - - - - - - - - - - - - -
Select the appropriate number [1-2] then [enter] (press 'c' to cancel):
Type 2 if it is the correct path and press enter on the keyboard. If everything goes correctly, then you will get a success message with the certificate locations.
Successfully received certificate.
Certificate is saved at: /etc/letsencrypt/live/unravelmedia.tech/fullchain.pem
Key is saved at:         /etc/letsencrypt/live/unravelmedia.tech/privkey.pem
This certificate expires on 2023-02-05.
These files will be updated when the certificate renews.
Certbot has set up a scheduled task to automatically renew this certificate in the background.
Now, login to the OpenLiteSpeed speed admin console and open the Virtual host section, and select the virtual host for that domain in which you have to configure the SSL certificate.

Now click on SSL and edit SSL Private Key & Certificate to configure the SSL certificate for the WordPress site.
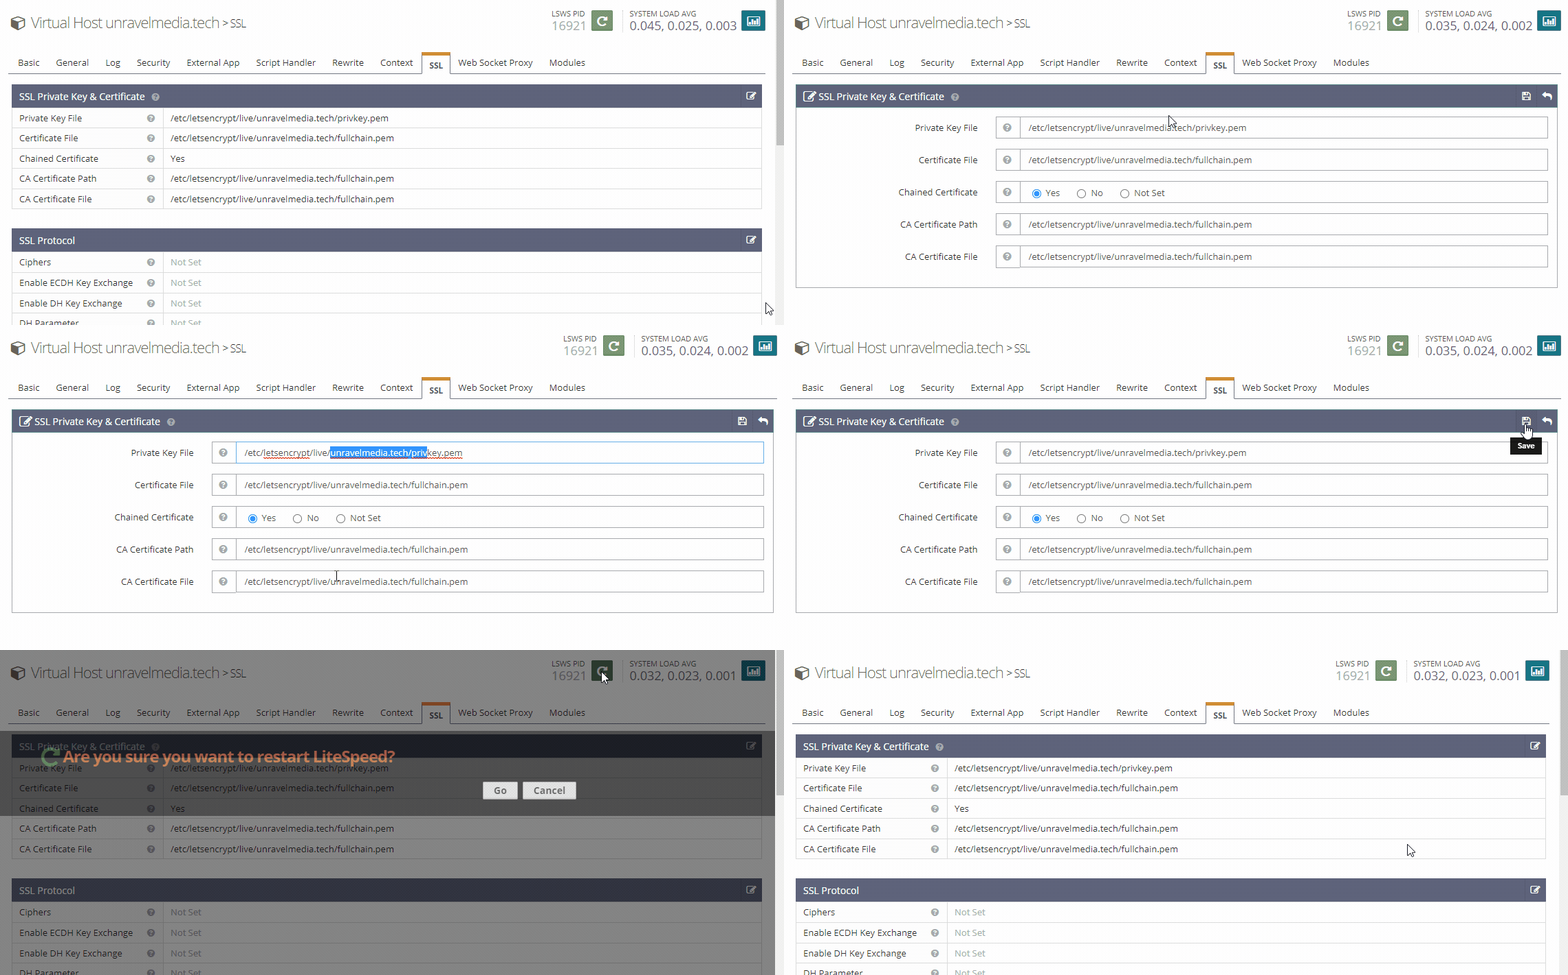
As you can see in the motion picture, you have to fill up the SSL private key and certificate path, which we have already generated using Certbot. The SSL certificate path will be as mentioned in the code box.
Private Key File: /etc/letsencrypt/live/<your-domain>/privkey.pem
Certificate File: /etc/letsencrypt/live/<your-domain>/fullchain.pem
Chained Certificate: Yes
CA Certificate Path: /etc/letsencrypt/live/<your-domain>/fullchain.pem
CA Certificate File: /etc/letsencrypt/live/<your-domain>/fullchain.pem
Note: - If you are using Cloudflare DNS and SSL/TLS is set to the Flexible SSL, then please change it to FULL or FULL (Strict). It will enable end-to-end encryption between the user’s browser and the server.
Set Rewrite Rules for HTTP to HTTPS redirection
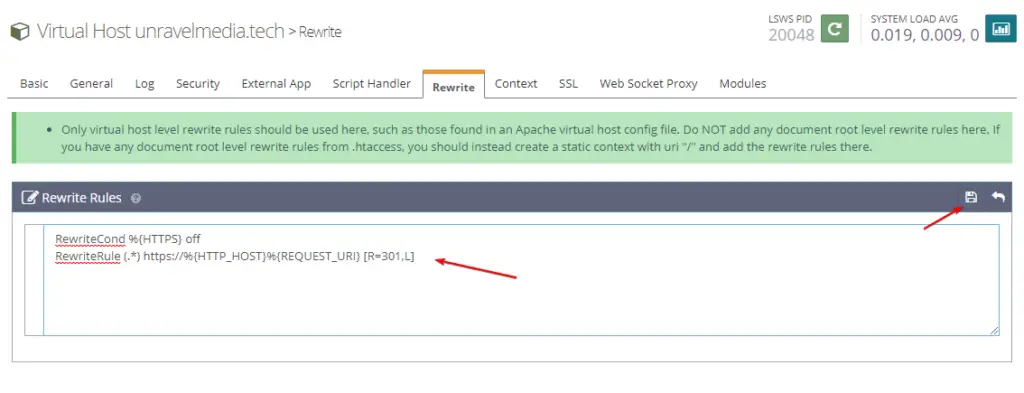
You can also add rewrite rules by adding information to the .htaccess file or you can set auto HTTPS redirect using WordPress plugin like Really Simple SSL. But adding these two lines on the server side will be very helpful. No need for any unnecessary bloated plugins that will impact your WordPress site performance.
RewriteCond %{HTTPS} off
RewriteRule (.*) https://%{HTTP_HOST}%{REQUEST_URI} [R=301,L]
After saving the rewrite rules, you must gracefully restart the server as fellow:

And then after a few minutes, you can test via visiting the site using the HTTP protocol, which will be automatically redirected to the HTTPS protocol. However, you can also check using the command line.
sudo curl -I example.comOutput:
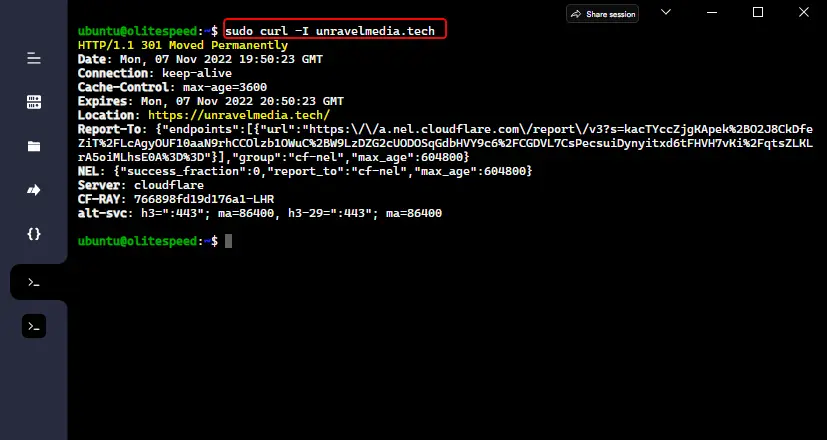
Now your WordPress site is almost ready to use. All the server-side configuration has been completed; however, you can tweak it here and there by yourself.
FAQs
What is OpenLiteSpeed WordPress?
OpenLiteSpeed is an open-source web server developed by LiteSpeed tech. and OpenLiteSpeed WordPress is a stack, which is included with OpenLiteSpeed web server, PHP, MySQL/MariaDB, and phpMyAdmin applications.
How do I use OpenLiteSpeed?
Using the OpenLiteSpeed web server is not so complicated, you can install it to the Linux system (Debian/Ubuntu, CentOS, AlmaLinux 8). OpenLiteSpeed uses port number 7080 for accessing the admin console, and by visiting http://your_server_ip:7080.
How to redirect HTTP to HTTPS on the OpenLiteSpeed server?
Login to the OpenLiteSpeed admin console and then select the virtual host of the site, which you want to redirect from HTTP to HTTPS. Now navigate to the Rewrite section and edit Rewrite Rules and add these two lines:RewriteCond %{HTTPS} off
RewriteRule (.*) https://%{HTTP_HOST}%{REQUEST_URI} [R=301,L]
Why does Google Translate stop working in WordPress when one uses the LiteSpeed cache plugin?
Google Translate is a third-party solution, and if you are using the LiteSpeed cache plugin on a WordPress site, it will block the JavaScript file which is Google Translate is using. However, by opening the LiteSpeed cache’s Page Optimization section you will find the Tuning option, there you have to exclude the JS file. Google Translate uses the https://translate.google.com/translate_a/element.js file, so you can mention it there.
Conclusion
In this tutorial, we learn how to install WordPress on the OpenLiteSpeed web server, which is presumably most faster web server for WordPress websites. OpenLiteSpeed is based on the LiteSpeed web server, developed by LiteSpeed tech, and they provide a free solution for individuals and paid solution (LiteSpeed Enterprise) for enterprise users.
Using the step-by-step solution referred on this article, you can install multiple WordPress websites in a single server with SSL certificates.
OpenLiteSpeed has a GUI-based admin console and using instructions you can easily configure Virtual hosts etc. It is easier to use as compared to the command line.
If you get any error while installing WordPress on OpenLiteSpeed or not working, or if something is wrong, please comment in the comment box. And if you need to migrate your WordPress website from the older web server to OpenLiteSpeed/LiteSpeed, then please contact us.