GeneratePress and Astra are some of the best, highly customizable WordPress themes. So, in this article, I am going to customize the post grid layouts in both of the themes, Astra and GeneratePress without using any kind of page builder.
So, let’s dive in…
Post Grid Layouts Customization in GeneratePress
GeneratePress theme is one of the highly modifiable themes in the WordPress database, and if you buy the premium version of GeneratePress then most of the things you can customize visually using GeneratePress custom elements.
I am going to customize the archive page, which includes our latest posts, and these latest posts are not so attractive by default. So, I am going to customize it without using any page builder.
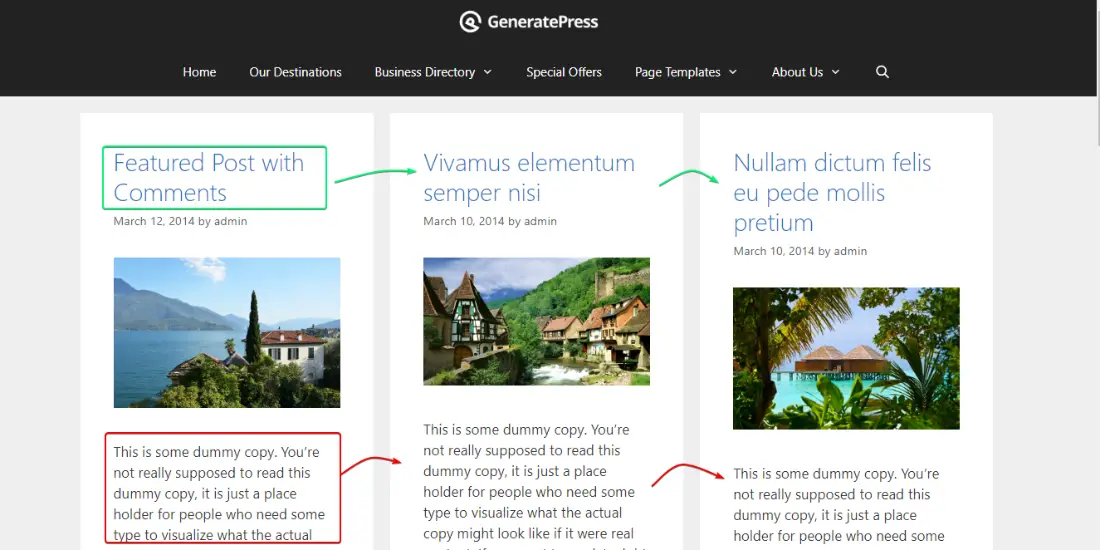
This is the basic grid layout of the GeneratePress theme, you can see there is a huge amount of excerpt text, Meta information, and bulky headline text.
I am going to change it all by using custom CSS, and if you want to same just follow the steps.
Step – 1. Open GeneratePress Customizer
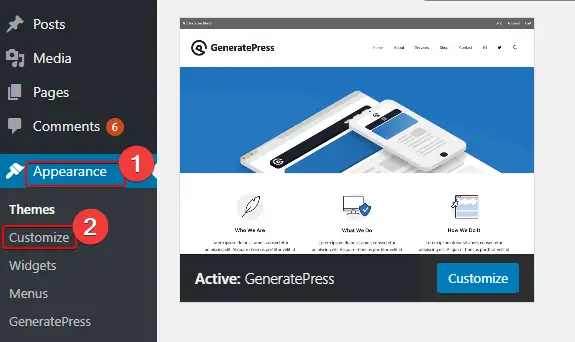
For this process, you need to log in to your WordPress dashboard and click on Appearance then click on Customize.
Step – 2. Customize the Default Layout of GeneratePress
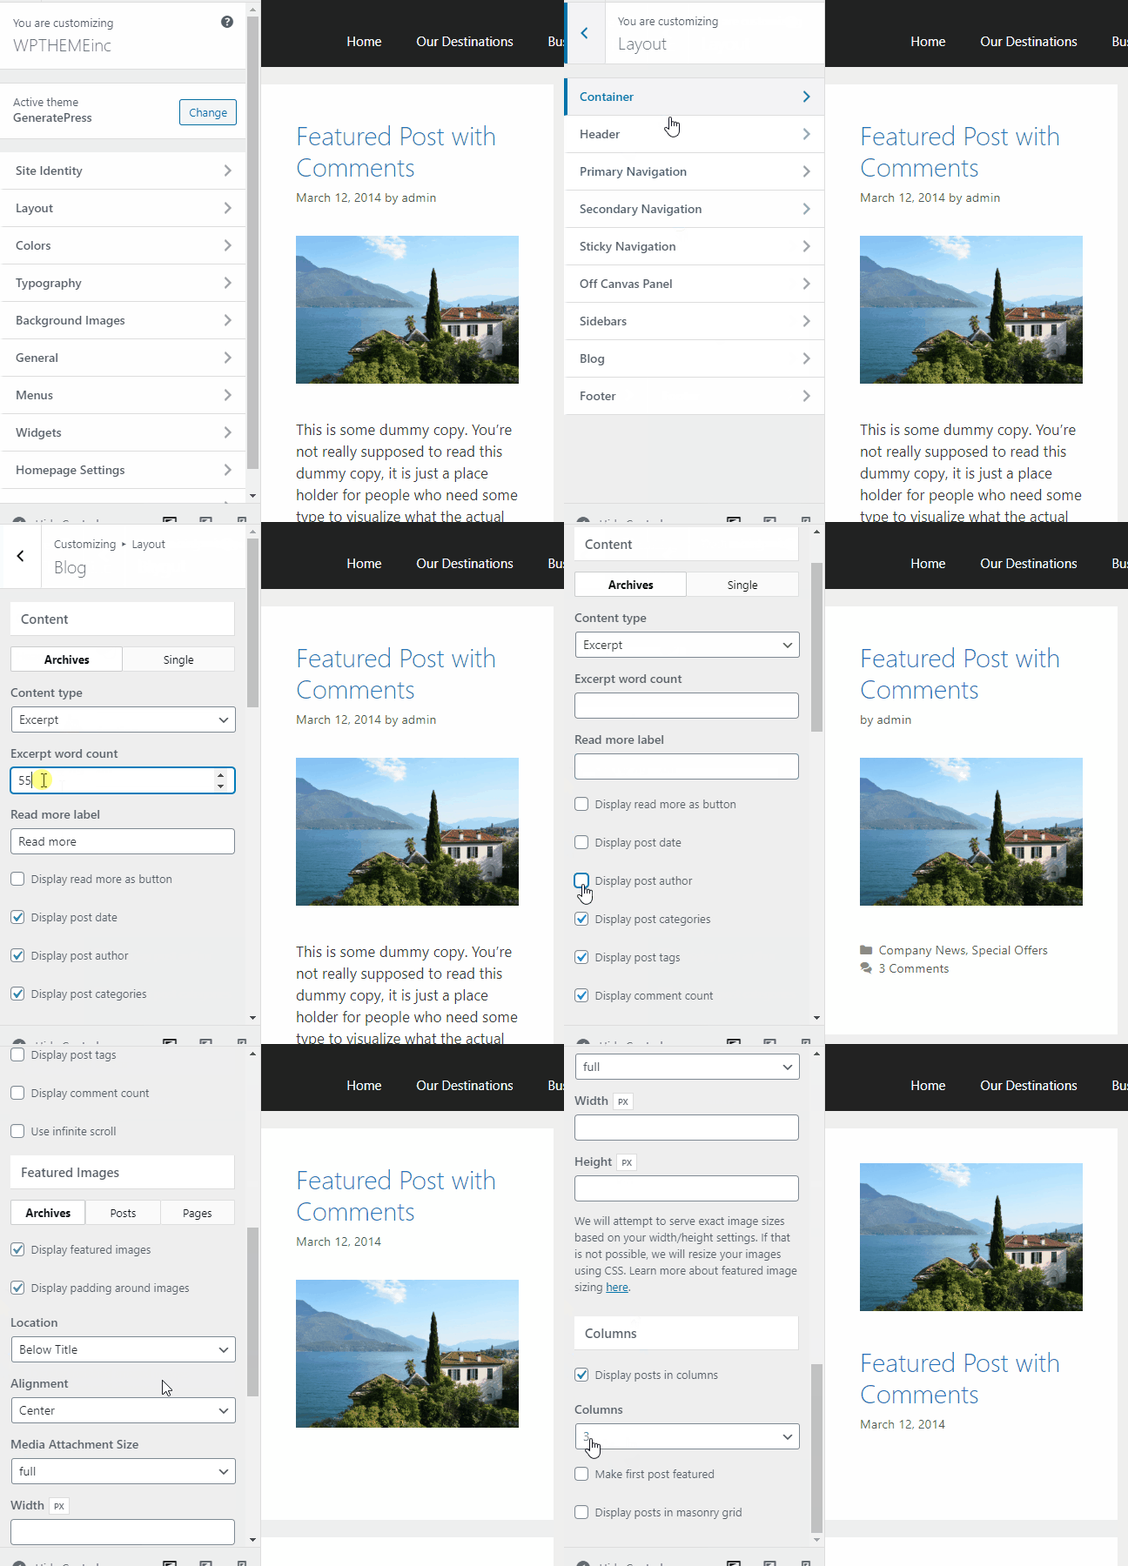
After opening the GeneratePress customizer then you will see the second option “Layout,” click on layout then select the second last option “Blog” and click on the blog, and now need some customization. Under the Archive section, you need to remove the Excerpt word count which is by default “55”.
Next, “Read more label” also you need to remove this sentence from the box and make an empty box. Under the read more label you will see some tick-boxes, you need to remove all the ticks, except “Display post date” this one is also optional if you want to remove you can.
After these procedures, scroll down and in the “Featured Images” section, you need to select the location of the featured image. The best practice is for placing featured images above the Title of the content. So, in the Location box select “Above Title”.
Now, again scroll down and go to the “Columns” section, so this is the option for showing your content in Grid-layout format. The first thing ticks the “Display post in columns”. When you mark the tick, you will see the columns box there you can select up to five columns but select only three columns and click on the blue “Publish” button.
Step – 3. Changing Content Layout of GeneratePress (Optional)
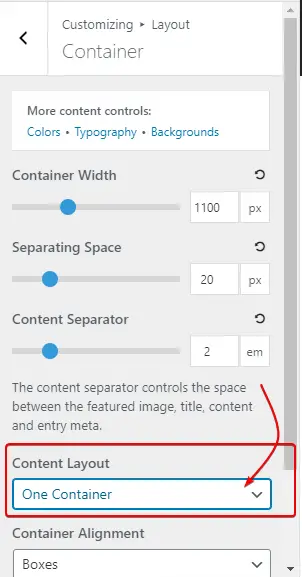
Changing the Content Layout is an optional choice, if you don’t change the layout it will not have much effect if you change then this option will remove the unnecessary padding from the Grid-layout.
So, click on Appearance > Layout > Container > Content Layout, in the content layout box by default select “Separate Containers” and you should change to “One Container” as you can see in the image below.
Step – 4. Disable GeneratePress Sidebar (Optional)
This step is also optional, but if you disable the sidebar just for the archive pages then the post-grid layout visuals will be marvelous, but it depends upon you.
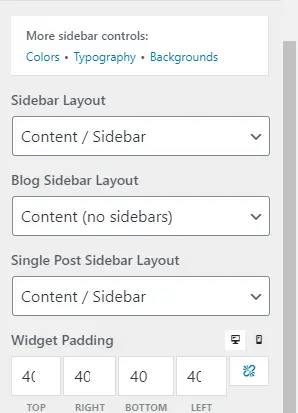
So, for disabling the sidebar you need to click on Appearance > Layout > Sidebar, after opening the sidebar option you will see the “Blog Sidebar Layout”, in this box you need to select “Content (no sidebars)” as you can see in the image below.
Step – 5. Add Custom CSS in GeneratePress Theme’s Additional CSS section.
This is the final step, and you will see the differences. So, first of all, you need to copy the following CSS code and just paste it into your additional CSS section.
.generate-columns .inside-article {
background-color: #f7fbfc;
transform: scale(0.9);
box-shadow: 0 0 0 1px #d6dade;
transition: all 0.1s ease-in;
}
.generate-columns .inside-article:hover {
transform: scale(1);
box-shadow: 0 10px 30px 0 rgba(0, 0, 0, 0.3);
}
.post-image {
line-height: 0;
}
h2.entry-title {
padding: 15px 0;
text-align: center;
font-size: 20px;
}
.archive .entry-summary,
.archive footer.entry-meta,
.archive.post-image-above-header .inside-article div.post-image,
.blog .entry-summary,
.blog footer.entry-meta,
.blog.post-image-above-header .inside-article div.post-image {
margin: 0;
}
.archive.one-container .inside-article,
.blog.one-container .inside-article {
padding: 0;
}
.generate-columns .inside-article {
background-color: rgba(0, 0, 0, 0.02);
transform: scale(0.9);
box-shadow: 0 0 0 1px #d6dade;
transition: all 0.1s ease-in;
}
.generate-columns .inside-article:hover {
transform: scale(1.01);
box-shadow: 0 10px 30px 0 rgba(0, 0, 0, 0.3);
}
.post-image {
line-height: 0;
}
h2.entry-title {
padding: 15px 0;
text-align: center;
}

.page .page-hero h1,
.single .page-hero h1 {
display: inline-flex;
background: rgba(0, 0, 0, 0.1);
border-bottom: 5px solid #f6c956;
padding: 20px;
margin-bottom: 0;
}
.entry-meta{
text-align: center;
}
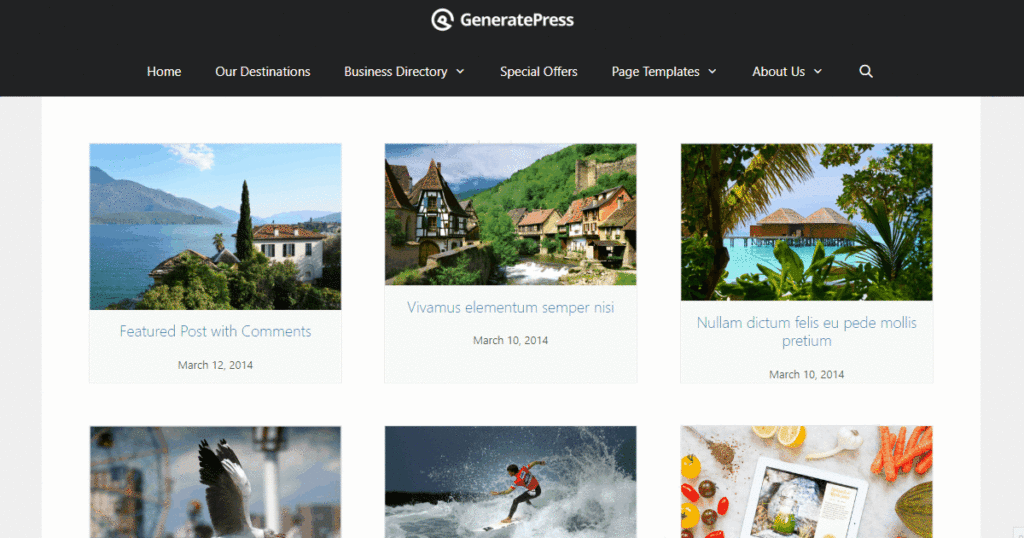
PREVIEW:
Post Grid Layouts Customization in Astra Theme
Astra is also a very popular theme for WordPress CMS because of its performance and customization. This theme also has modular functionality like the GeneratePress theme. Astra (free version) is great if we compare it with the GeneratePress (free version), in terms of features – check the comparison of GeneratePress Vs Astra.
Astra theme has more functions than the GeneratePress theme, and when it comes to customization GeneratePress wins. So, here I am going to tell you how you can customize your post grid layouts with transitional effects.
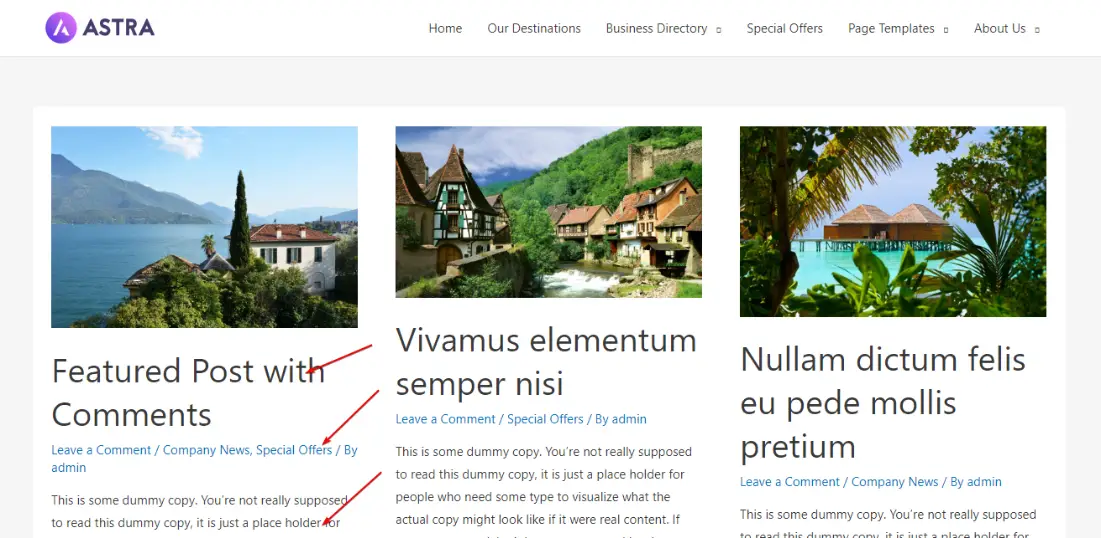
Keep in mind for this process, you will need the Astra pro version as well, and you can see the default post grid layouts of the Astra theme in the image below.
Step – 1. Open Astra Customizer
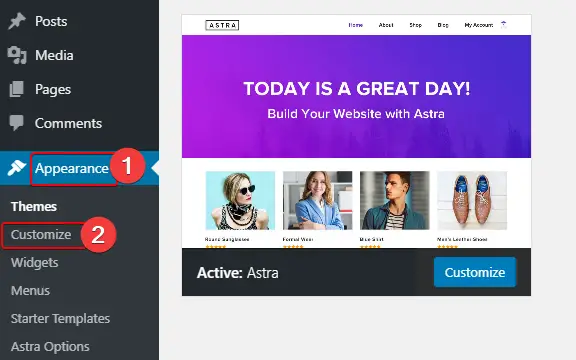
Login to your WordPress website dashboard and click on Appearance then click on Customize.
Step – 2. Customize Default Post Grid Layouts of Astra
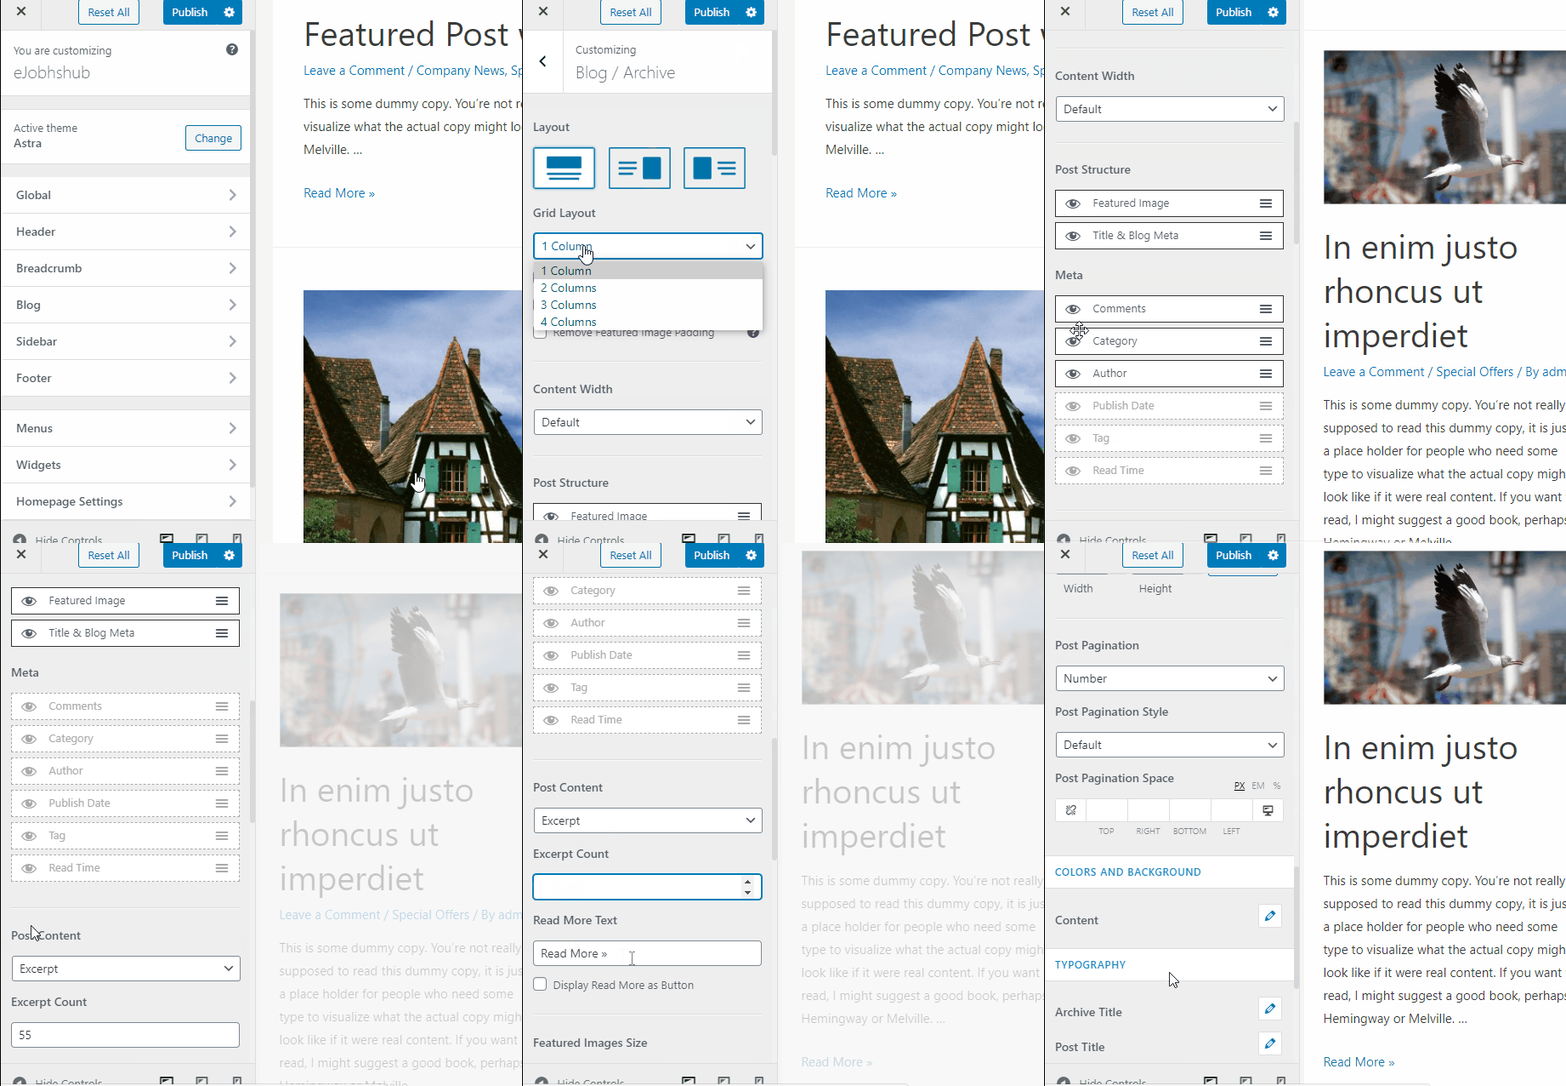
When you click on Customize then you will see the “Blog” section in the customizer, just click on it and select “Blog / Archive” then you will see a grid layout box, there will be a selected 1 column by default, so you need to change it to 3 columns. You can change up to 4 columns.
Now, scroll down and go to the Meta section and hide all the meta options, and if you want to show the dates in grid layout then you should leave the Published date meta.
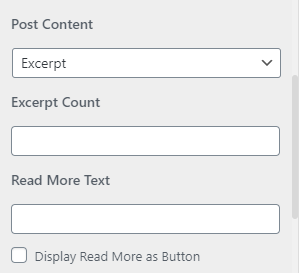
Next, again scroll down and you will see the Excerpt Count box and it is filled with 55 values, you need to remove and leave it blank as you can see in the image below, and also do the same with Read More Text and click on blue Publish button.
Step – 3. Disable Astra Sidebar (Optional)
This is an optional step, but if you want that your grid looks more attractive then I suggest you remove sidebars for archive pages.
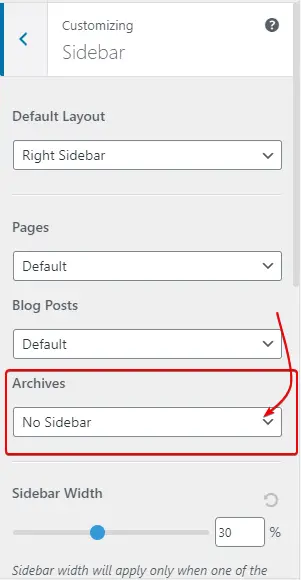
So, you need to click on Appearance > Customize > Sidebar, now you will see it in the Archives and you need to change the Default option to No Sidebar as shown in the image below.
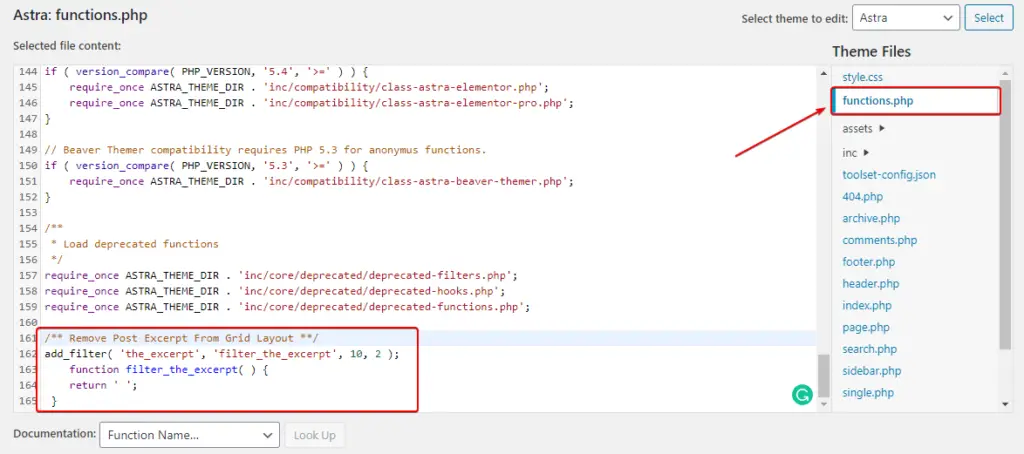
Step – 4. Disable Post Excerpt by editing the Astra theme function
In the second step, we had already changed the Except Count value but in the Astra theme, you can’t remove the post excerpt completely by changing the value 0.
So, we need to add some lines of code in the Astra theme’s function.php file. You can edit through cPanel or FTP clients, but the best way to do this click on Appearance > Theme Editor.
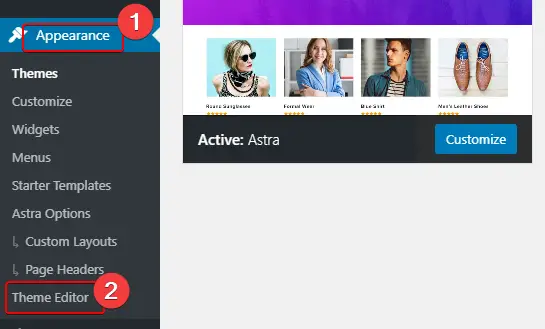
Now click on the function.php and add these following codes in the last of all and update the file. After that, you can check your grid layout, and there will be no more post excerpts.
/** Remove Post Excerpt From Grid Layout **/
add_filter( 'the_excerpt', 'filter_the_excerpt', 10, 2 );
    function filter_the_excerpt( ) {
    return ' ';
 }
Step – 5. Add Custom CSS in Astra Theme’s Additional CSS section
This is the last step of the process, so you need to click on Appearance > Customize > Additional CSS and add the following lines of CSS code in the box and you will see the instant differences.
.blog-layout-1{
    background-color: #f7fbfc;
    transform: scale(0.9);
    box-shadow: 0 0 0 1px #d6dade;
    transition: all 0.1s ease-in;
}
.blog-layout-1:hover {
    transform: scale(1);
    box-shadow: 0 10px 30px 0 rgba(0, 0, 0, 0.3);
}
.post-thumb {
    line-height: 0;
}
h2.entry-title {
    padding: 15px 0;
    text-align: center;
    font-size: 20px;
}
.entry-meta{
	text-align:center;
}

.blog-layout-1{
    background-color: rgba(0, 0, 0, 0.02);
    transform: scale(0.9);
    box-shadow: 0 0 0 1px #d6dade;
    transition: all 0.1s ease-in;
}
.blog-layout-1:hover {
    transform: scale(1.01);
    box-shadow: 0 10px 30px 0 rgba(0, 0, 0, 0.3);
}
.post-thumb {
    line-height: 0;
}
h2.entry-title {
    padding: 15px 0;
    text-align: center;
}
.ast-no-date-box{
	padding:0;
}
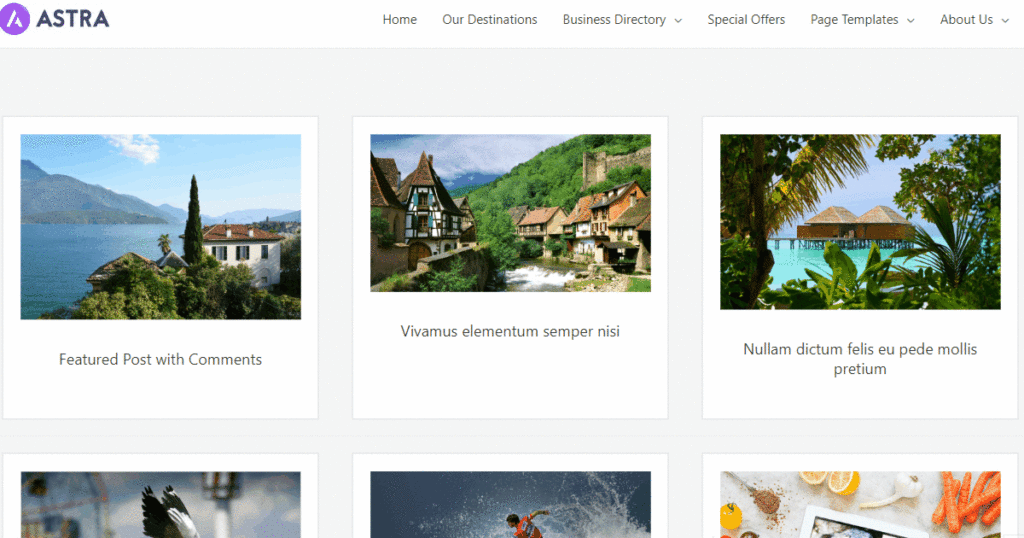
PREVIEW:
Conclusion
Okay guys, behind this article my thought process was that those people who haven’t premium page builders like Elementor Pro also can create awesome Post Grid layouts just using some lines of code.
In this article, I have shown some basic customization tricks although I am not from a coding background, if you are then you can customize beyond that.
If you think this article was helpful for you and it could be helpful for your close one, then please share, and don’t forget to ask if you have anything in mind.
Thank You! ✌

Thankyou so much for sharing a great information
Glad to help! Brother ❤️
Hey Pronay ,
Excellent and well-written post. I truly appreciate your hard-works.
It is my first time commenting on your blog post and i am glad to say that you have done a fantastic work and provided helpful tips to create transitional post grid in Astra & GeneratePress theme. I really like the way you have explained everything in such a step-by-step process making the concept very clear and easy to understand. Your each listed steps ( including images ) for doing post grid customization using Astra & GeneratePress theme are so clear, well-elaborated and also providing good understanding as well. Following the steps will be great helping hand and allows several user to create transitional post grid in GeneratePress & Astra theme very easily.
After going through this complete guide i really gain ideas and have also boosted my knowledge upto some limit. I am sure that this post will definitely help lots of people & readers.
Eventually thanks for sharing your knowledge, ideas and such an informative post.
Regards
-Aadarsh
Thanks to Brother Aadarsh, for your awesome comment. 💖
Thank you so much Pronay, I was just searching for this.
Great post! Only problem is that the Grid option is not listed under my Blog/Archive Section. It starts with Content Width and then moves on to Post Structure, Meta, etc. Any idea where they moved the Grid option to? Thanks!
Try Astra theme if you want Grid layout