Installing WordPress on LiteSpeed/OpenLiteSpeed is simple, even compared to Apache and Nginx. For little cases, you will need to use the command line, and it is not as hard as in Apache, there you have to create virtual hosts, etc via the command line for every site. In LiteSpeed, you will get a WebAdmin console to manage almost everything.
In this article, I will share how you can add a subdomain on LiteSpeed and install WordPress. The WordPress installation process will be the same as installing WordPress on TLD on OpenLiteSpeed.
Table of Content:
- Step – 1. Create/Add a Subdomain on DNS and point to the server
- Step – 2. Create WordPress Directories on the OpenLiteSpeed server
- Step – 3. Create a new Virtual Host
- Step – 4. Map Virtual Host with Listeners
- Step – 5. Create a Database for the subdomain
- Step – 6. Configure WordPress on Subdomain
- Conclusion
Step#1
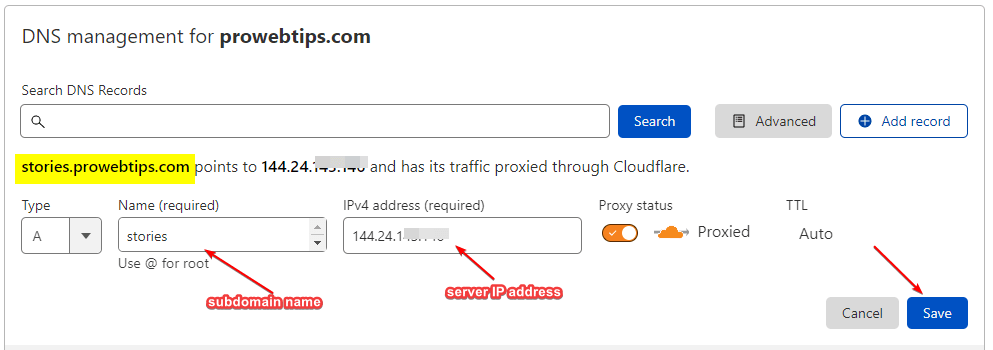
Create/Add a Subdomain on DNS and point to the server
Step#2
Create WordPress Directories on the OpenLiteSpeed server
Connect to the server using an SSH connection, then create the following directories, where the WordPress will be located. So, use the following commands to create directories or sub-directories for the subdomain:
sudo mkdir /usr/local/lsws/<subdomain>sudo mkdir /usr/local/lsws/<subdomain>/{html,logs}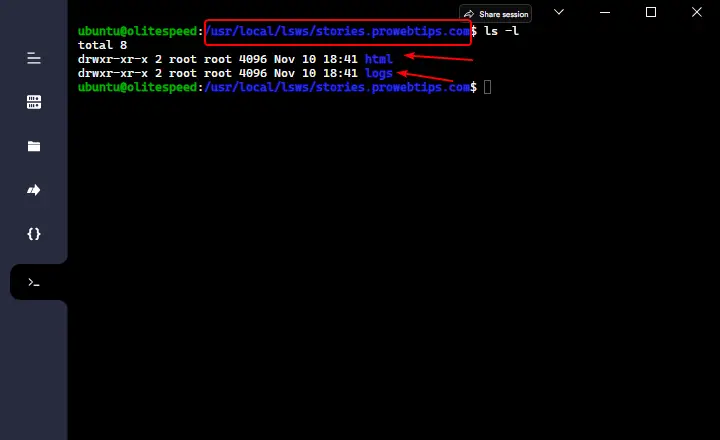
Give proper Read & Write permissions
We also need to give the server proper read-write access without it, WordPress won’t be able to install plugins, themes, and other background stuff. So, using the following commands you can give permissions.
sudo chown -R nobody:nogroup /usr/local/lsws/<your_site>sudo chmod 755 -R /usr/local/lsws/<your_site>Download the WordPress Files
After creating the directories for the subdomain, now we have to download WordPress files, as we are going to install WordPress on that subdomain. First, we are going to download the latest WordPress zip file then extract it, and move the files into the root directory, which we created earlier step.
Use the following command to get the WordPress zip/tar file:
sudo wget -c https://wordpress.org/latest.tar.gzExtract the downloaded WordPress compressed file:
sudo tar -xvzf latest.tar.gzCopy the extracted file into the subdomain’s HTML directory:
sudo rsync -avP ~/wordpress/ /usr/local/lsws/<subdomain>/html/Step#3
Create a Virtual Host for Subdomain
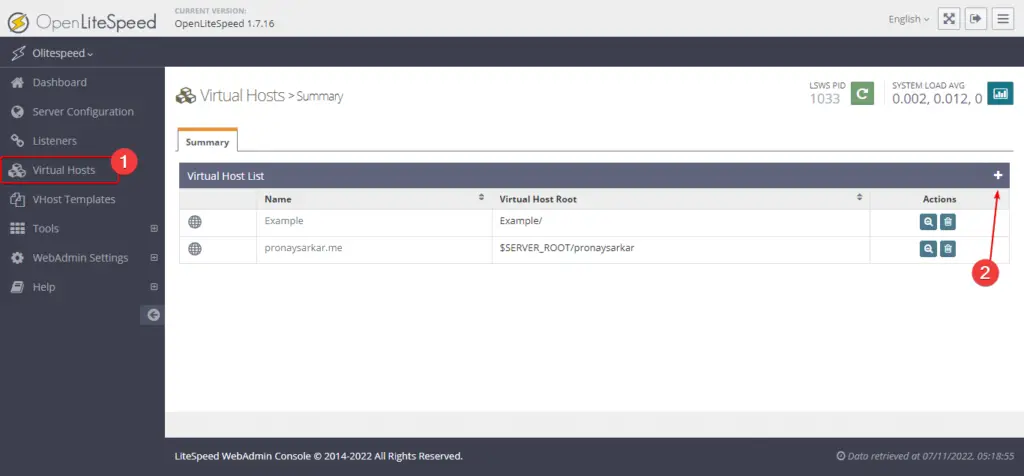
Login to the OpenLiteSpeed web admin console, and navigate to the Virtual host section, when you click it you will get an all the virtual host list. Click on the plus (+) sign to add a new virtual host.
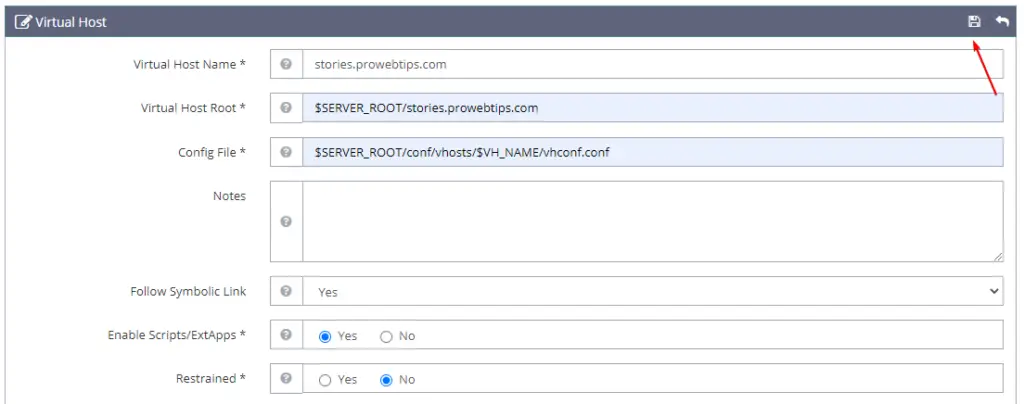
When you try to add a new virtual host, you will have to fill up some necessary information as mentioned in the list below.
- Virtual Host Name: subdomain_name
- Virtual Host Root:
$SERVER_ROOT/subdomain_name - Config File:
$SERVER_ROOT/conf/vhosts/$VH_NAME/vhconf.conf - Follow Symbolic Link: Yes
- Enable Scripts/ExtApps: Yes
- Restrained: No
After entering the following information as mentioned in the list above, click on the saving icon to save the details. However, the config file will show that it does not exist, “CLICK TO CREATE”, so, click on it and then hit the saving icon again. You will return to the list, then click on the magnification glass to view and edit the virtual host for the subdomain.
After opening the particular subdomain virtual host, it will show various tabs for various configurations, like general, security, SSL, and other settings.
Edit General Settings
Under the ‘General’ tab, you will get a general setting as shown in the image below. You have to configure the following information as mentioned in the list below.

- Document Root:
$VH_ROOT/html - Domain Name: subdomain.example.com
- Domain Aliases: www.subdomain.example.com
- Administrator Email: [email protected]
- Enable GZIP Compression: Yes
By default, all the information will be set “Not Set” so, by clicking the editing icon you will be able to edit the following information. In the domain name section, you must mention your subdomain name.
The next step will be configuring the index files, which are under the ‘General’ settings tab. As we are going to install WordPress on a subdomain, and WordPress has an index.php file, so by mentioning it on the web server, will help to handle the traffic.
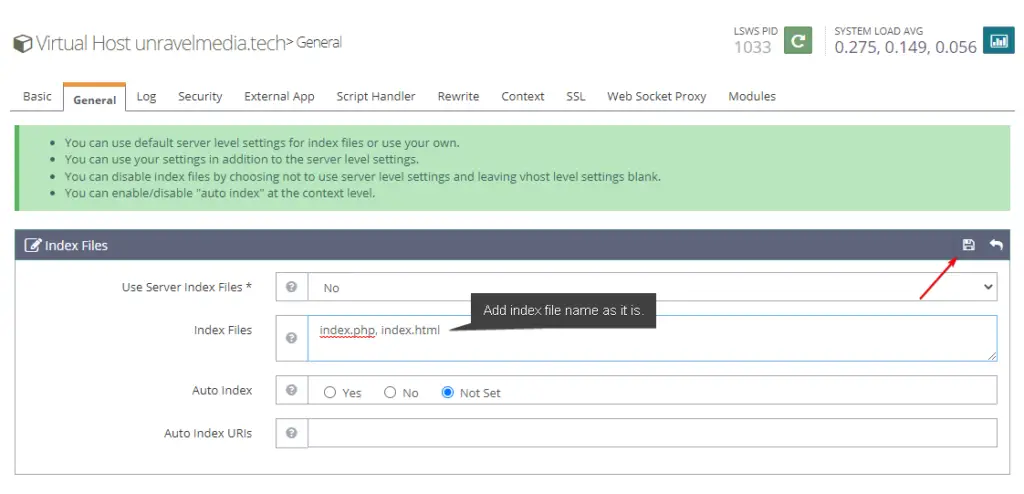
Click to edit icon to set up index files on the OpenLiteSpeed web server, and mention these two files in the Index files section as shown in the image above:
- index.php
- index.html
You will also get other settings under the General settings tab, where you can personalize custom error pages, expires headers, file uploads, and override the php.ini file. These settings and not required to be set up, however, you can do that if necessary to you. Suppose you want to maximize file upload size, PHP memory size, etc, you can do that by tweaking these settings.
Edit Rewrite Settings
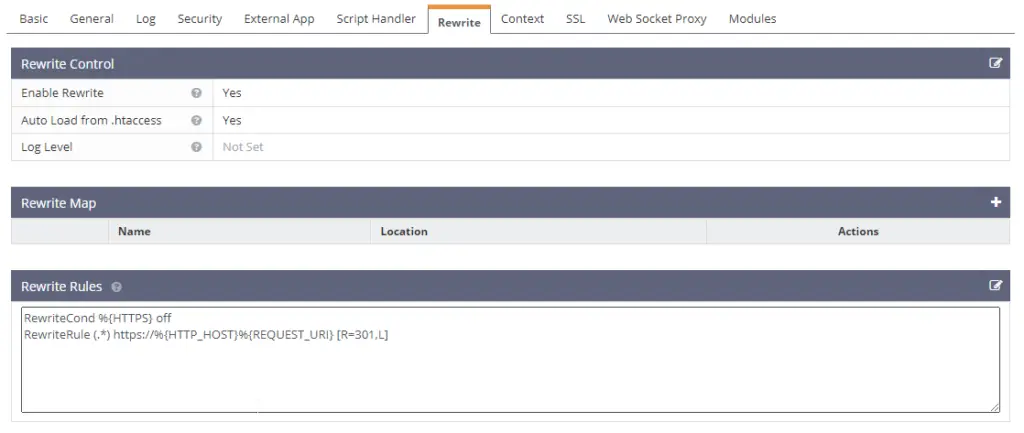
Enabling Rewrite on the web server is necessary for handling the URL redirects. It is a key component of the web server. In this section, you will get the setting options, rewrite control, rewrite map, and rewrite rules.
As shown in the image, you have to edit rewrite controls, there you have to enable rewrite, and auto-loads from .htaccess. Afterward, you have to edit rewrite rules where you have to mention two lines of code to redirect your site from HTTP to HTTPS protocol automatically.
RewriteCond %{HTTPS} off
RewriteRule (.*) https://%{HTTP_HOST}%{REQUEST_URI} [R=301,L]
Step#4
Map Virtual Host with Listeners for HTTP/HTTPS traffic
In this step, you will need to map the virtual host to the listeners. But you must have HTTP and HTTPS listeners already on your OpenLiteSpeed web server. In case you haven’t created it yet then check out this article where we installed a WordPress website on OpenLiteSpeed.

As shown in the image above, navigate to the “Listeners” section and edit both HTTP and HTTPS listeners and under the address settings in the ‘General’ tab, you will get ‘Virtual Host Mappings.’
There you have to map the virtual host, which you have created for the subdomain, and save the mappings on both listeners.
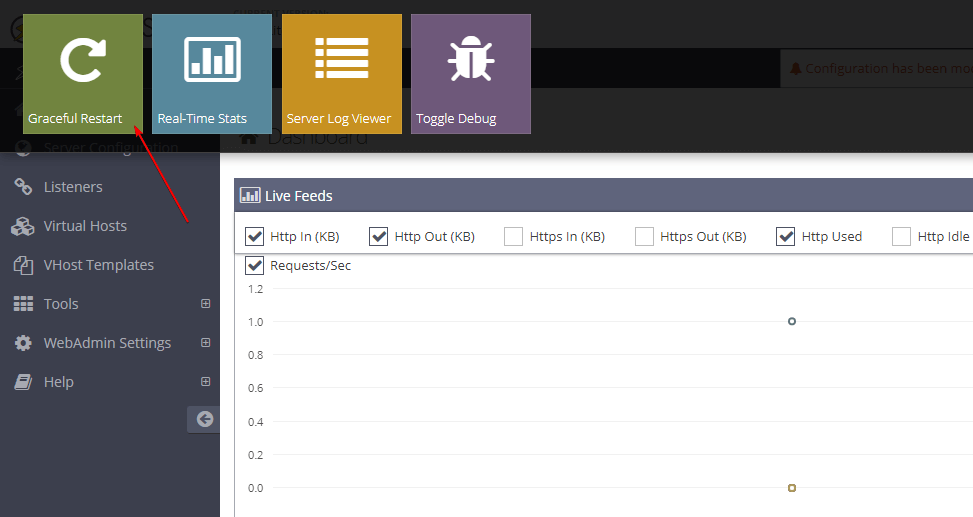
After saving all the configurations, just need to do a graceful restart to save all the information. And then we proceed to the next step, which is creating a database for the subdomain.

Do You Need Affordable & Clutter-free Cloud Hosting?
Vultr cloud is one of the best cloud hosting platforms for bloggers, developers, and businesses. Their pricing starts from $2.5 per month, claim $100 free credit for Vultr Cloud.
Step#5
Create a Database for the subdomain
Here I assume you have installed MySQL/MariaDB on the system, now using the following commands you can create a database for the subdomain where you want to install a WordPress site.
In case you haven’t installed the database server, then check out the tutorial, where I wrote how to install the OpenLiteSpeed web server with MySQL/MariaDB, and PHP 8.1 on Ubuntu.
Login MySQL/MariaDB:
MariaDB server will prompt you to enter the root password when executing the following command.
sudo mysql -u root -pCreate Database & Give Privileges:
For reference we took an example name, please replace it with any name that you want.
CREATE DATABASE example;GRANT ALL PRIVILEGES ON example.* TO root@localhost;FLUSH PRIVILEGES;Exit;If you don’t encounter any error while using these commands to create a database, that means database creation is successful. However, you can check all the database lists using the following command > SHOW DATABASES; before exiting the MySQL CLI.
Step#6
Configure WordPress on Subdomain
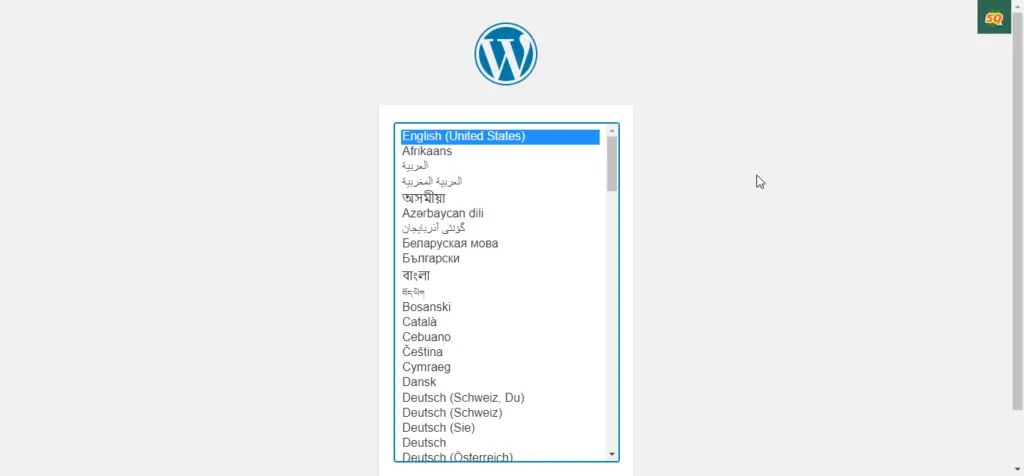
Open your subdomain name in a new browser tab, the WordPress setup page will open to you. Select the language and proceed step-by-step.
Select Language:
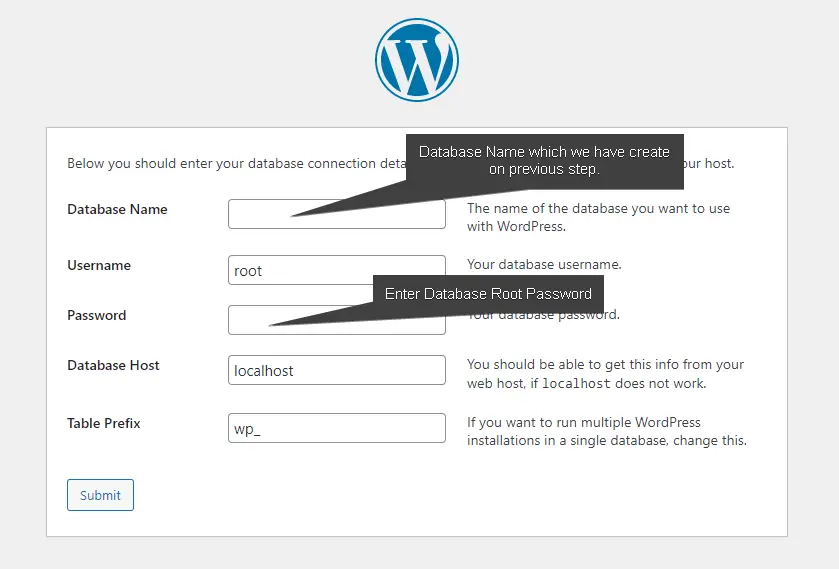
Enter Database Credentials:
WordPress Site Information:
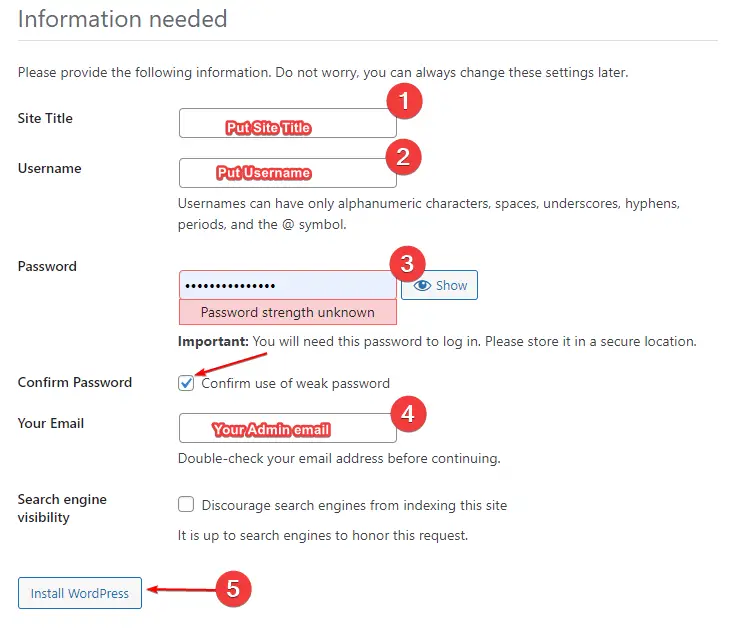
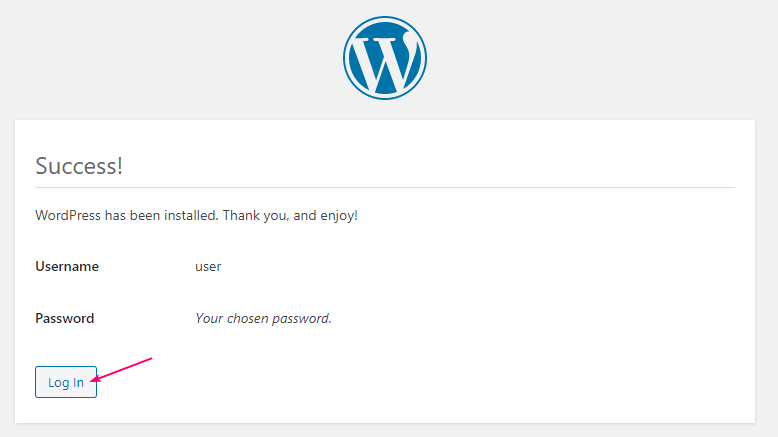
Now fill up, the WordPress site’s information and admin credentials to secure access.
Conclusion
In this tutorial, we learn how to add a subdomain and install WordPress on the OpenLiteSpeed web server, which is presumably most faster web server for WordPress websites.
OpenLiteSpeed has a GUI-based admin console and using instructions you can easily configure Virtual hosts, Listeners, and other configurations.
If you get any error while adding a subdomain and installing WordPress on OpenLiteSpeed or else, please comment in the comment box, and I will try to help.