Are you disappointed with the speed of your WordPress website? So, don’t be disappointed, here is a solution for your poor WordPress website speed. You must install the WP Rocket optimization plugin.
In this article, I am going to explain, why should you use WP Rocket, and how you can optimize your WordPress website, step by step.
Table of Content:
- Why should you use WP Rocket?
- Optimize Your WordPress Website
- Step – 1. Upload & Activate
- Step – 2. Open Setting & Enable Cache
- Step – 3. Static Files Optimization
- Step – 4. Media Files Optimization
- Step – 5. Preload or DNS Prefetch
- Step – 6. Advanced Rules
- Step – 7. Database Optimization
- Step – 8. CDN Configuration
- Step – 9. Heartbeat Optimization
- Step – 10. Add-on Features
- WP Rocket Optimization Report
- Conclusion
Why should you use WP Rocket?
If you know, that people have negative experiences with your website then, they are not like to purchase or visit again on your website.

According to one of the recent surveys of Google, state that “A one-second delay in mobile load times can impact mobile conversions by up to 20%”.
So, that is the main reason for using WP Rocket caching plugin, this plugin doesn’t only work as a caching enabler, it also helps in various optimization of WordPress websites.
Now, you will say, there are many plugins like this and even free, so why not use them, instead of WP Rocket? Okay, that is a good question, and I am going to tell it in short.
WP Rocket has a very user-friendly interface that anyone can use, with no need for any technical knowledge. 99% of your optimization problems will be solved with WP Rocket, just you need to toggle it on or off.
By the way, you can check out the review article of WP Rocket, there I have also compared it with other popular plugins like W3 Total cache, WP fastest cache, etc.
Optimize Your WordPress Website with WP Rocket
Here I am, now I am going to tell you how you goanna optimizes your WordPress website with WP Rocket. If you haven’t purchased a license of WP Rocket, then first thing first purchase a WP Rocket license, then follow these steps.
Step – 1. Upload & Activate WP Rocket Plugin
In the first step, you need to upload your WP Rocket plugin to your WordPress website. You upload plugins directly through the WordPress dashboard and even through any FTP Client.
So, you need to click on Plugin, shown in your WordPress website’s dashboard left side, then click on Add New and then Upload Plugin, now simply upload your WP Rocket plugin. 
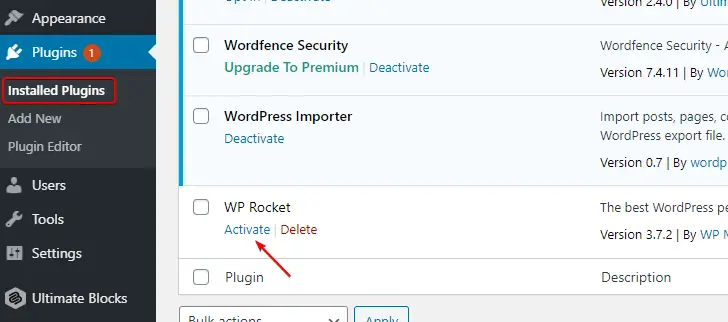
After, successfully uploading the plugin, return to the Installed Plugin section, scroll down, and activate the WP Rocket plugin.
Step – 2. Open WP Rocket Setting & Enable Cache
Now, you can see the WP Rocket toolbar in the top menu, click and select Settings. Now you will see the dashboard of WP Rocket, where you will find your License type and Validity or Expiration date, no need to set up here, so click on “CACHE”.
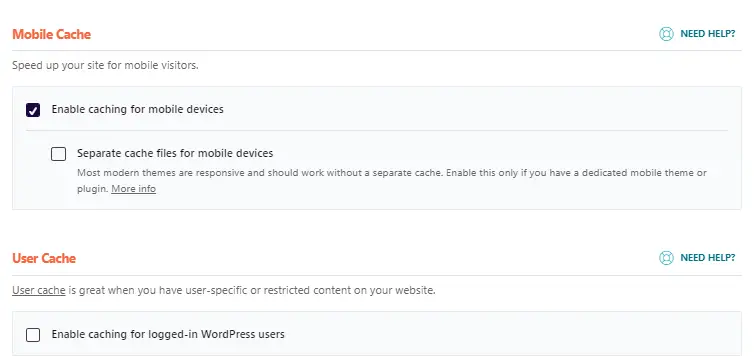
Enable caching for mobile devices, as you can see in the image above and one more thing, if you have a separate or dedicated mobile theme or plugin then you can also enable separate caching. But nowadays most WordPress themes are responsive, so no need to enable this feature.
Next is User Cache (Logged-in WordPress User & even the Administrator), I don’t recommend this option, but if you want then definitely enable this feature.
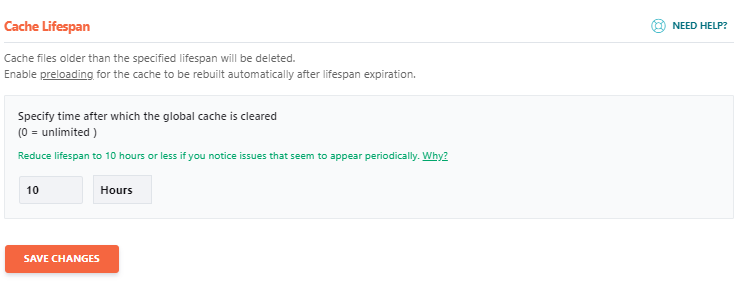
Now, you need to set up the Cache Lifespan, which by default is 10 hours selected, if you want more time or less then you can modify it, but for blogging uses, I will recommend ten hours minimum lifespan time.
Step – 3. File Optimization Using WP Rocket
This is the third option in WP Rocket, and it is very important in terms of WordPress website speed optimization. In this option, you are going to see how you can minify and optimize HTML, CSS, Java Scripts, and jQuery, even though we are going to combine them.
Note: - Combining CSS and JavaScript can break your site's visuals, so enable the one-by-one features and check the visuals and performance. In case if you broke the site then disable the feature, the site will reach a prior state.
HTML Optimization:

You need to enable one feature at a time and refresh your website in a private tab. So, the first thing is the Basic Settings, enabling both Minify HTML and Optimize Google Fonts. Minifying HTML will remove the whitespace from your HTML files.
CSS Optimization:
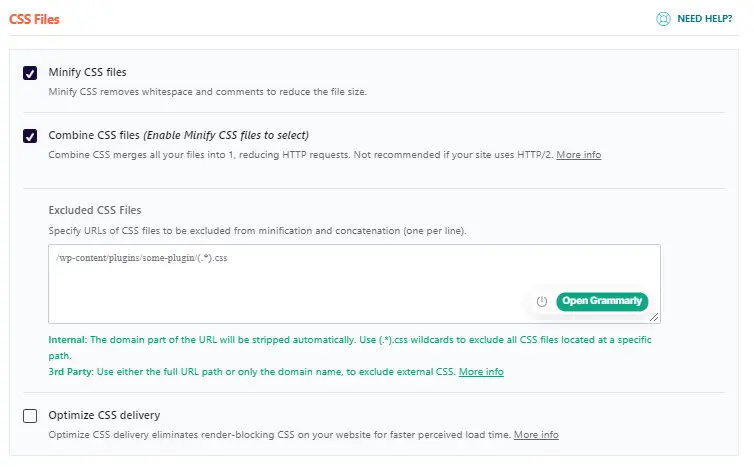
Now the CSS files, you need to Minify and Combine the CSS files, which will reduce the CSS file sizes and reduce the HTTP requests. As you can see in the image above, you need to tick both options, you can also exclude any specific CSS file, in case that plugin or theme does not work.
Note: - When you enable these features on the WP Rocket setting, you will see a pop-up warning, so you should click on the yellow activate button as shown in the image below.

There was one more option “Optimize CSS delivery”, I will recommend not to enable this feature now, this option breaks your site. So, I am going to tell you, how to set up this option in the last.
JavaScript Optimization:
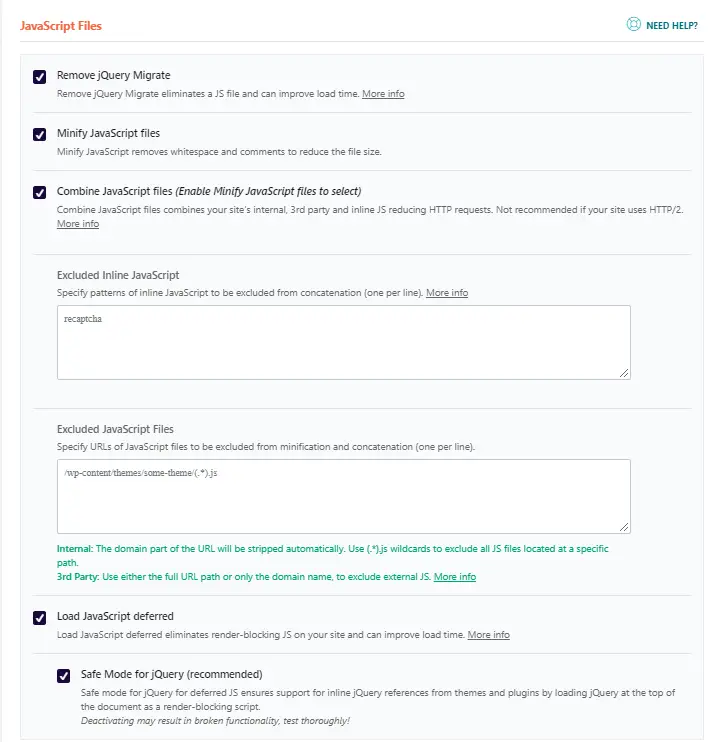
Next is JavaScript optimization, here you need to choose one by one option and check out your website performance. When you enable minification and combining of JavaScript, you will get two boxes for excluding any critical JavaScript or JavaScript file.
Suppose you have Google ReCaptcha on your website, then you should exclude the JavaScript by mentioning the name. If you not, then anyone can bypass the captcha.
There is two more option as you can see in the image above, Load JavaScript deferred and Safe Mode for jQuery, I also recommend enabling both options for better performance.
Step – 4. Media Optimization Using WP Rocket
Media optimization also improves the website’s performance and speed, so WP Rocket has this feature in-built, no need to install an extra plugin for this. You can enable Lazyload, iFrames replacement for YouTube videos, and more.
Lazyload & Emoji:
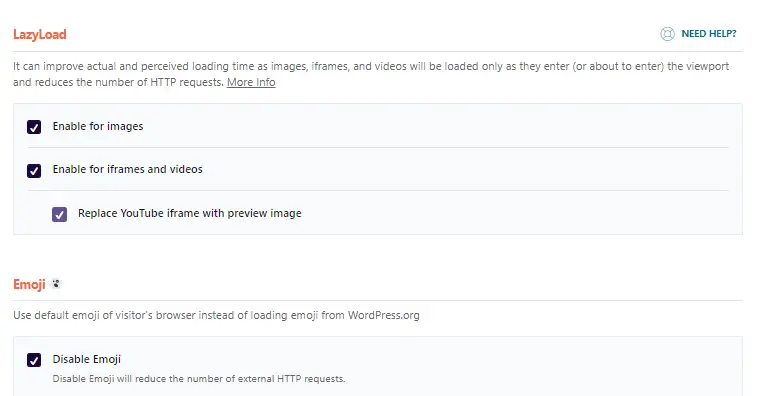
As you can see in the image above, you need to enable all features. Enable lazy loading for images and videos, and replace the YouTube iframe with a preview image, so the website’s load time will reduce. WordPress by default enables emojis and those are unnecessary, so you should tick on Disable Emoji and it will reduce the HTTP request and page load time.
Embeds & WebP compatibility:
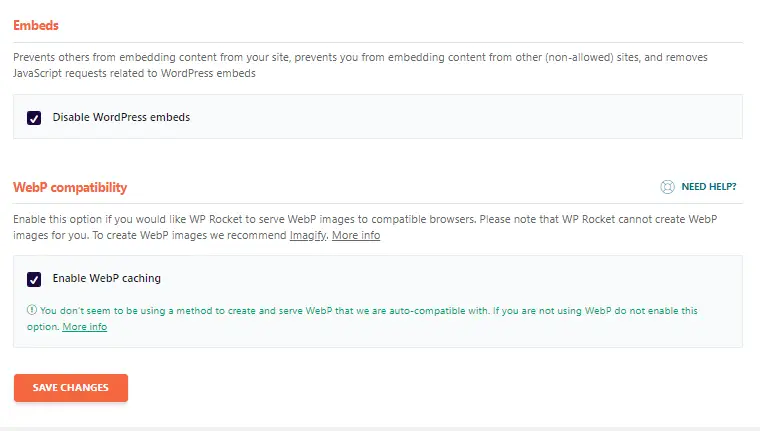
Now, you need to disable the embeds feature, if you are not then anyone can steal your bandwidth and it will increase your HTTP request.
If your website has a WebP image serving feature, then you need to enable the WebP caching option for better performance.
Step – 5. Preload or Prefetch URL Using WP Rocket
When you enable preloading, WP Rocket will generate the cache starting with the links on your homepage followed by the sitemaps you specify. Preloading is automatically triggered when you add or update content and can also be manually triggered from the admin bar or the WP Rocket Dashboard.
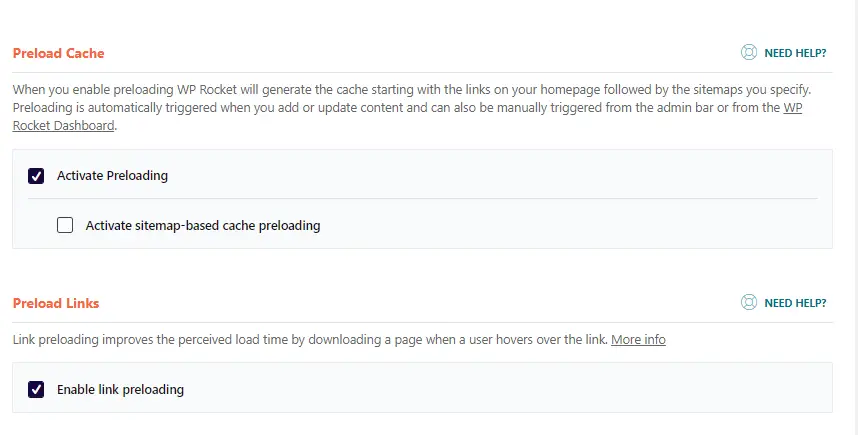
As you can see in the image above, you can also enable link preloading, when a visitor will hover the mouse upon any links, the WP Rocket will automatically preload the page.
Now you need to preload or prefetch some links which are locally present on your website and some links that are present externally like Google fonts, Google Analytics, etc.
Prefetch DNS Requests:

If you mention all those external links, which cause a huge number of DNS requests, then it could reduce the page requests and improve the website’s performance.
Preload Fonts:
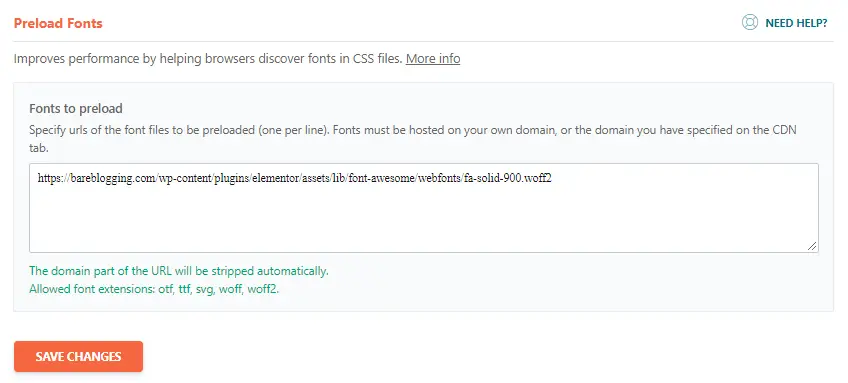
Preload fonts are also very helpful for reducing DOM requests. You need to identify which fonts are using your theme (font extensions: – otf, ttf, svg, woff, woff2), if you enter the wrong fonts path, it will occur 404 error requests. So, you need to analyze your website on the browser using Inspect Mode (CTRL + SHIFT + I).
Step – 6. Advanced Rules on WP Rocket
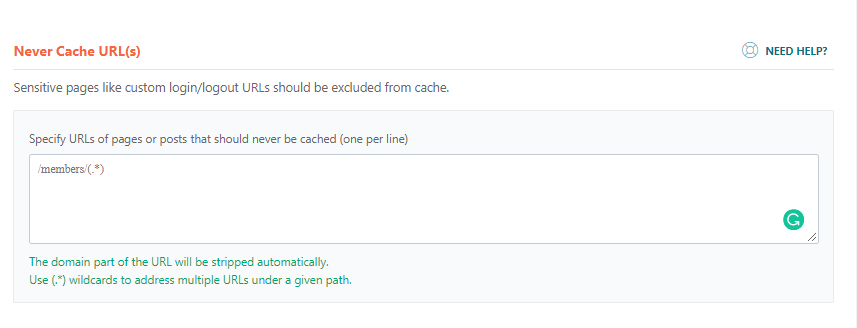
Advanced rules are very helpful, in case you don’t want to cache any specific URL, File, String, or Cookies, and even if you want to purge always a specific URL or something then you can do it very easily.
Step – 7. Database Optimization with WP Rocket
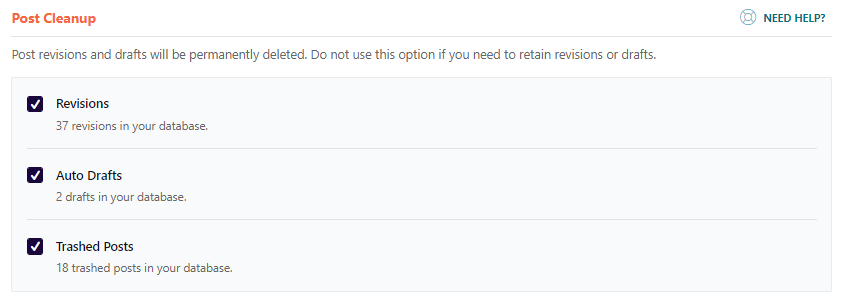
Database optimization is very easy when you have WP Rocket installed in your WordPress dashboard. So, why do we need to optimize the database?
Good question and the answer is also simple. Dynamic websites always need some changes, and when we do, then the database stores the old obsolete versions and it causes a high load time.
Post Cleanup:
Comments Cleanup:

Transients Cleanup:

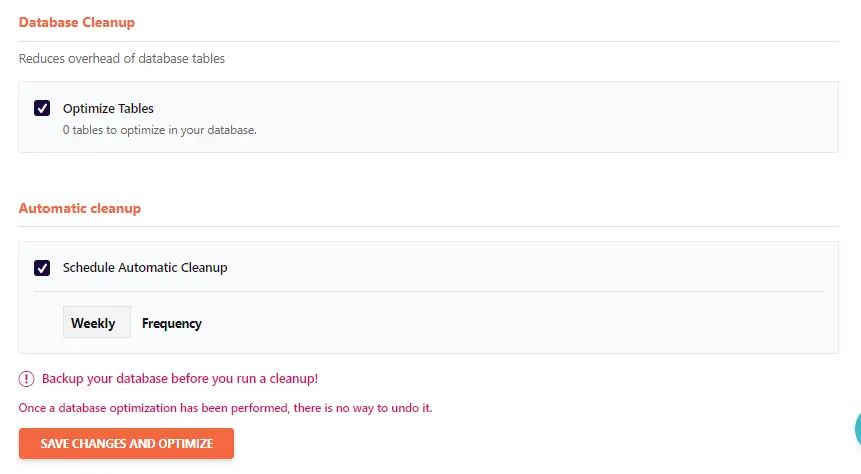
Database Cleanup:
Step – 8. CDN Configuration on WP Rocket
If you have CDN (Content Delivery Network) services for your website, then you can enable this feature for getting the blazing fast performance. You need to enter your CDN URL by adding CNAME. If you want to exclude some files from CDN then you can specify them in the box.
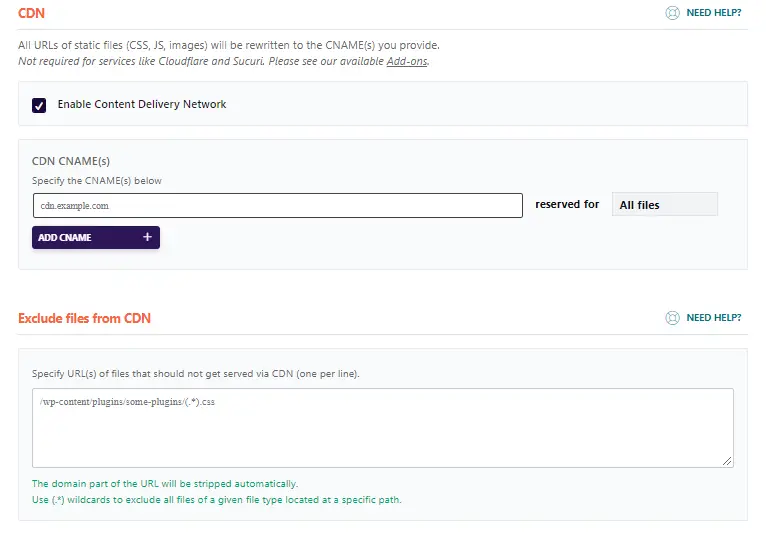
If you do not have any premium CDN service, then try out the world-class CDN service from WP Rocket CDN for free.
Step – 9. Heartbeat Optimization Using WP Rocket
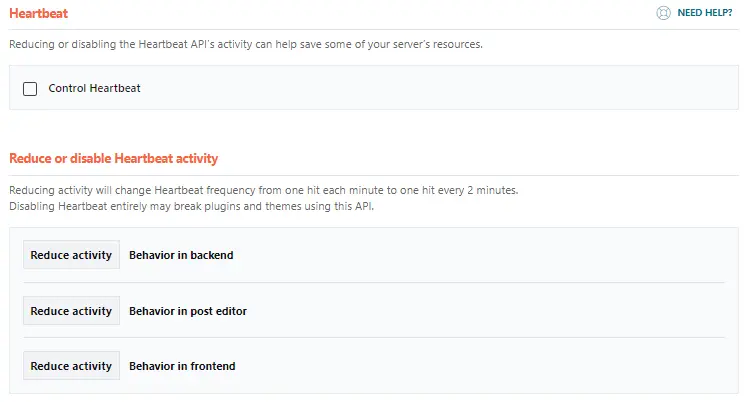
When you enable Control Heartbeat, then Heartbeat API’s activity can help save some of your server’s resources. I do not recommend this unless you have a problem with the server.
Step – 10. Add-ons Features on WP Rocket
WP Rocket has some extra optimization features in this section, there you will find Google Analytics, Facebook Pixel, and Cloudflare optimization options.
Google Analytics:

Facebook Pixels:

Varnish:

Cloudflare:

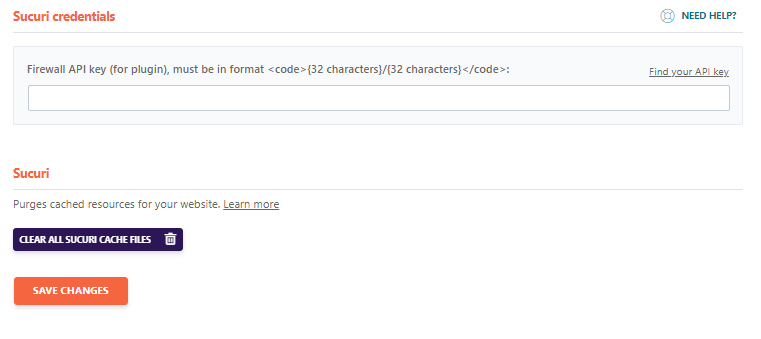
Sucuri API (Optional):
WP Rocket Optimization Report
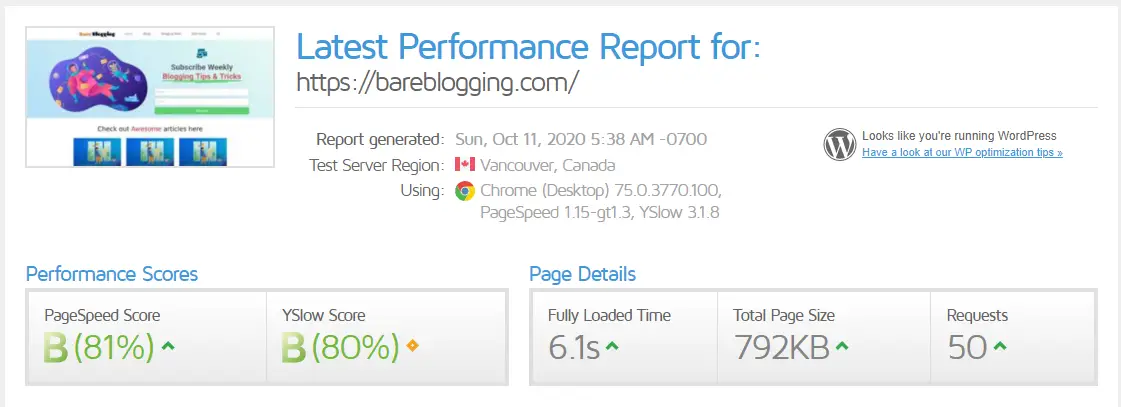
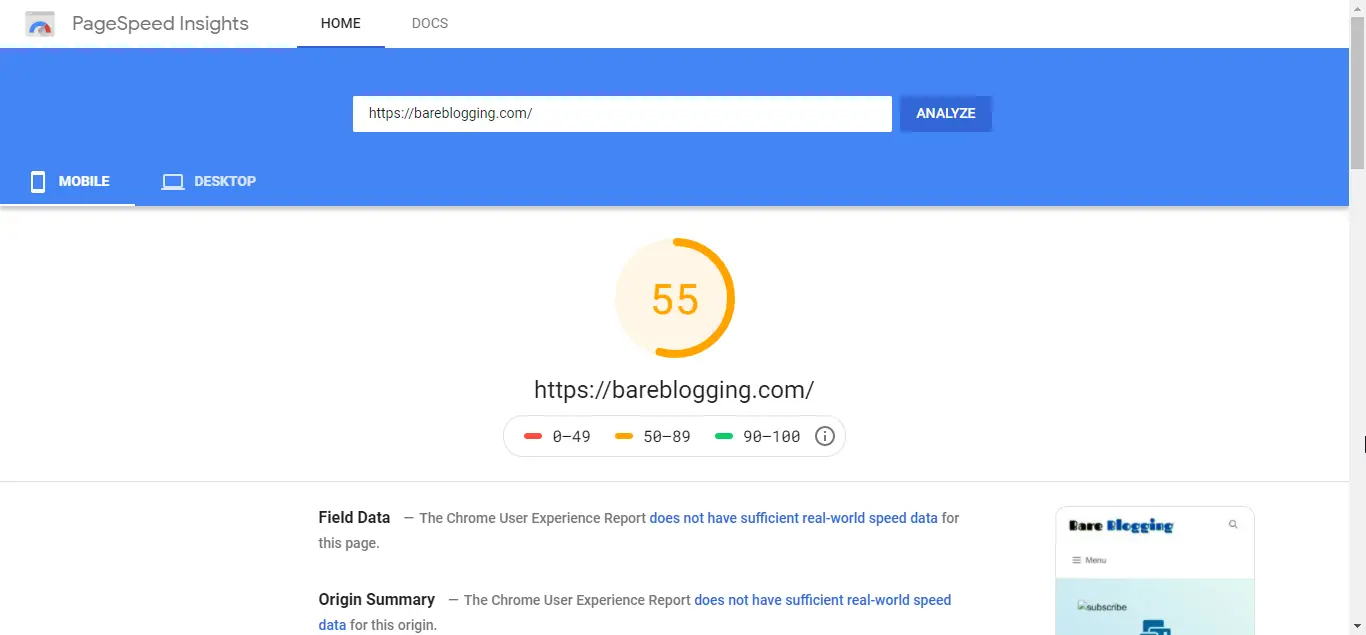
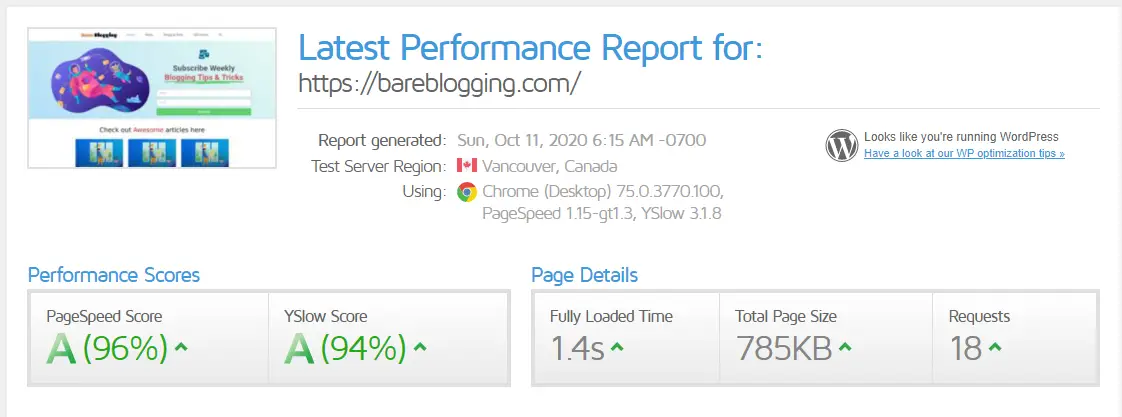
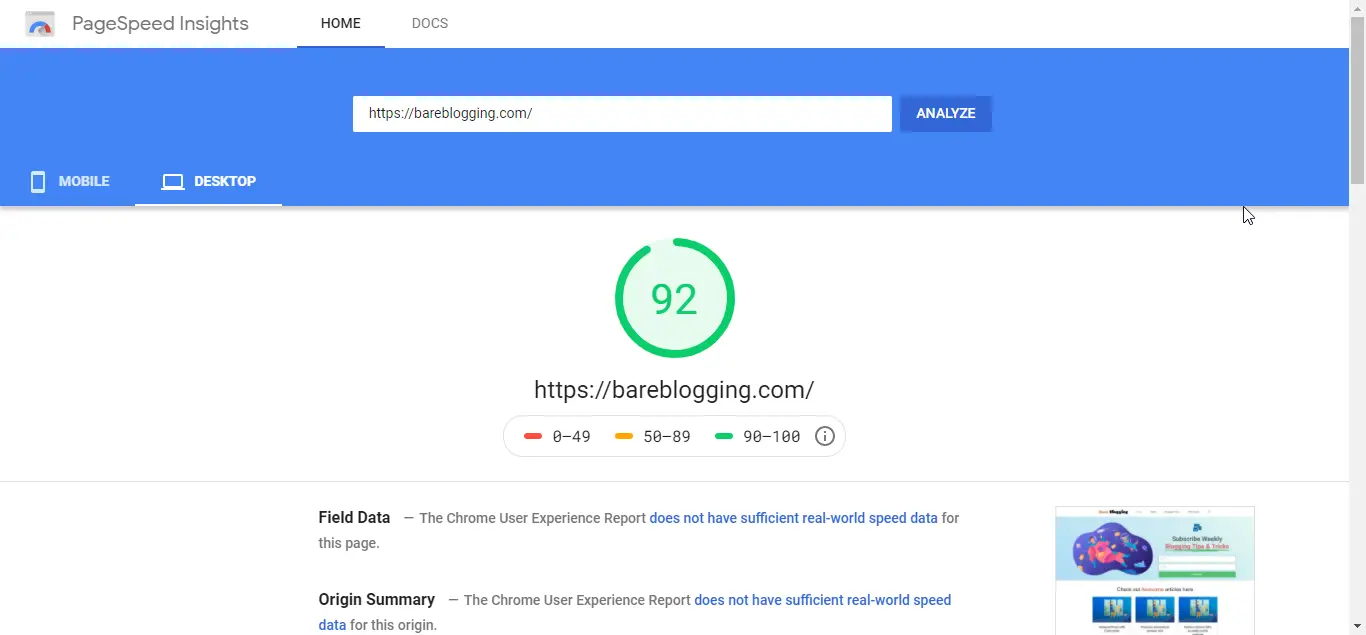
This is my website’s actual optimization, and I have also recorded speed test reports before optimization and after optimization of WP Rocket, speed test reports.
Before Optimization
As you can see from the results of the speed tests, these two tests are recorded before any optimization on WP Rocket.
GTMetrix Speed Test:
Google PageSpeed Insight:
After Optimization
As now you can see the file results, and these are after WP Rocket optimization, you can see the huge differences between the first tests and the last tests.
GTMetrix Speed Test:
Google PageSpeed Insight:
Conclusion
WP Rocket plugin is the only plugin that’s can help you to improve your website’s speed and performance, and for this, you need to just pay $49 only. This plugin is highly recommended by most popular bloggers and digital marketers.
If you just think that taking the WP Rocket plugin will speed up your website in milliseconds, then it is not so at all. It is also based on the best hosting of your website.
If you take shared hosting, from Namecheap, Hostinger, Hostgator, or GreenGeeks, you will be able to see a considerable amount of website speed improvements using WP Rocket.
Even if you have cloud hosting services like Cloudways, Digital Ocean, Vultr, or Managed WordPress hosting like Nexcess or Liquid Web, then after using WP Rocket you will get 4x better performance than shared web hosting.
If you want to buy the WP Rocket plugin use our link (You will get some gifts from us.) and don’t forget to comment here after WP Rocket installation, and If you like this article please share. 🙏

WP Rocket is a great tool to increase your website speed. I heard once, but after reading your blog on that topic, my doubts are cleared. Wonderful Explanation.
Thanks to you, brother Robin, for your comment.
Yeah! WP Rocket is a great tool for optimizing WordPress website.
HI Pronay, speed really matters. You are right. It should be fast and your suggested plugin gives wonderful result to increase speed of website. I will try and get the benefit.
Your Right Brother, Rakesh, Nowadays speed really matter. Peoples want faster and faster internet experiences, they got faster devices to access but other hands Websites also need to be faster to give that experiences.
Thanks for the great comment.
Awesome explanation, Hats off man
Thanks for your valuable response.